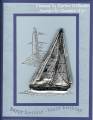
Birthday card for my Hubby. For the sailboat, I cut the pop can top and bottom off and down the side so I had a rectangle. Then stamped image with black stazon ink. Let dry completely. Using pad only from S.U. Mat Pack, with small end of stylus, I outlined (on the front side) the sails and boat. Then turned over and used larger end of stylus to "puff" the sails and around outer edge to turn edges down. Then used pieces of foam (non S.U. was thicker than dimensionals) to add dimension. If you haven't tried this yet, try it, you will love it!!!!
Date: Wednesday, January 2, 2008 GMT Views: 3462
Favorited:39
Registered: September 25, 2004 Location: Eaton Rapids, MI Posts: 169
Thu, Jan 03, 2008 @ 6:03 AM
I love this card! But, I don't understand "pop can dry emboss". Can you explain it further? The sailboat looks shaded. What did you use to do the shading? TIA
Registered: October 7, 2006 Location: Colorado Posts: 84
Thu, Jan 03, 2008 @ 6:28 AM
For the sailboat, I cut the pop can top and bottom off and down the side so I had a rectangle. Then stamped image with black stazon ink. Let dry completely. Using pad only from S.U. Mat Pack, with small end of stylus, I outlined (on the front side) the sails and boat. Then turned over and used larger end of stylus to "puff" the sails and around outer edge to turn edges down. Then used pieces of foam (non S.U. was thicker than dimensionals) to add dimension. If you haven't tried this yet, try it, you will love it!!!! Also, I stamped the background with the swirly thing from Bronc Buster, waves from Winds of Grace for wind and water look plus on the very bottom only, the shell and sand stamp from sparkling summer. TFL :-)
Registered: January 29, 2005 Location: Canada Posts: 736
Sat, Jan 05, 2008 @ 5:00 AM
This is very striking.
I didn't know what the pop can reference was either but I am guessing that you ended up with a flat piece of metal to stamp on by taking off the top and bottom of a can and cutting the seam ???