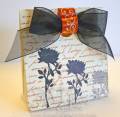
This little gift bag is an Accucut template that you may be able to find at your local scrapbook store.
Supplies:
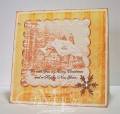
-Spanish Script Background by Cornish Heritage Farms
-Silhouette Blooms Stamp set by Kim Hughes for CHF
-Pearlescent Rust Brilliance Ink by Tsukineko
-Jet Black Archival Ink by Ranger
-piercing tool
-Piercing ruler by Making Memories
-black fine tip marker
-wide black organdy ribbon by May Arts
-Imperial Topaz patterned ribbon from Michael's
-Mounting Squares by Scrapbook Adhesives
-glue dots
Project Instructions:
1. The die cut box will be flat when it comes out of the die cut machine. Leaving it flat allows you to work on the surface more easily.
2. Stamp the Spanish Script Backgrounder on the front and back panel in Pearlescent Rust ink and allow to dry. Be sure to think about how the box is going to fold together and make sure you stamp the script in a way that it will be right side up when assembled.
3. Stamp the flower with Jet Black Archival Ink (my favorite permanent ink) three times in a row without re-inking so the image gets lighter with each impression. Note: I chose to stamp the script with an ink that had a metallic element so it would show through the flowers a little. Metallic pigment in an ink will always over power a dye ink.
4. Faux stitch along the side seams of the bag. First pierce a straight row of holes, then pull your ruler back slightly and use it to run you pen along the holes in that same straight line.
5. Fold along the scored lines made by the die cut machine, add adhesive to the smallest flaps and assemble your bag.
6. Tie a bow with the black organdy ribbon.
7. Cut a 4 inch length of decorative ribbon. Wrap one end of the ribbon around the middle of the bow and attach with a glue dot. Pull the other end of the decorative ribbon through the open hole in the bag and wrap it around the top of the bag and secure behind the bow with a glue dot.
Date: Saturday, November 24, 2007 GMT Views: 669
Favorited:7