Registered: February 13, 2006 Location: New Jersey Posts: 294
Mon, Nov 12, 2007 @ 3:53 PM
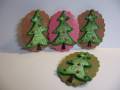
To all who have requested exactly how these were made, I'm happy you like them and all the credit goes to my teacher & friend "atgiblin" (check out her awesome gallery).
First I punched out 4 scalloped ovals (this is for 1 pin), glue one on top of the other with tacky glue ( I prefer Aileen's in a jar, not the bottle). You will have a little time to slide each one around to perfectly align before it starts to set up, then move to the next layer. On the top oval stamp as you wish.
Next glue 3 layers of cardstock together big enough to accomadate the tree. Stamp the tree on the top layer and cut out after it dries at least a few minutes (you don't want it too slippery). Take a permanent pigment type marker such as a sharpie and run it around all the edges of the tree and the ovals. This gives your piece a totally finished and dimensional look when completed. DO NOT use water based markers for this step, they will run when sprayed with finish (ask me how I know this).
Glue tree to oval, decorate tree as desired. On these pins I punched circles of red line tape and adhered micro beads to them and colored the trunk with a brown sharpie.
Next you want to start spraying several light, even, coats of "Krylon Triple Thick Glaze" (don't forget at least 2 coats on the back for added stability). During the final front coat add dazzling diamonds if desired.
Finally, apply pin back with E-6000 glue. Hope this makes sense. Have Fun !