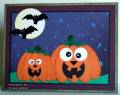
My inspiration for these little goofs came from a piece of scrapbooking paper with a row of pumpkins across the bottom that I used on cards but had lots of left over night sky to use up, so the punched pumpkins came to mind and of course a chance to use the bat dollar stamp I picked up the same day I created worked out perfectly. Here is a link to the cards with the inspiration paper.
The Stampin Up ovals are stamped with Weathered background the ink distressed on the edges before gluing together. No cutting was done on the ovals like IÂ’ve done on previous pumpkin creations.
The eyes are a combo of circle punches and a touch of ink distressing on the larger set.
The mouth is about ¼” of a circle punch for the top curve then punched further down to finish the mouth shape with shapes scissor cut for the teeth.
The nose is just cut scraps.
The stem is free hand cut with marker and distressing ink. The leaves are a maple leaf punch cut in half and decorated the same as the stem.
The moon was punched from the decorative paper and So Saffron used to distress the edges. Bats are cut out, black marker along the edges and tacky glued in place.
The green layer of cardstock is white cardstock with direct paper Mellow Moss. Direct to paper/DTP – rub the ink right on the cardstock.
The grass is cut in a wave and run thru the Cuttlebug, itÂ’s a Fiskars embossing plate that I mist with water and run through with in stacking order of the A plate, cardstock, two plumbers gaskets from the hardware store and a B plate. The thickness of your cardstock will determine the thickness of extra cardstock needed to get the impression to work.
Plumbers gasket is a 6” square piece of rubber and I trimmed mine down a bit, wash it firs if it’s oily to avoid getting it on the tools or cardstock.
Date: Wednesday, September 5, 2007 GMT Views: 1252
Favorited:37
Stamps: Stampin Up – Weathered, G Studio/Joann’s dollar stamp - bats
Paper: White flat and textured, green, plum textured, designer paper
Ink: StazOn – Jet Black, Stampin Up classic – So Saffron, Creamy Carmel, Mellow Moss Tim Holtz/Range/Adirondack – Tea Dye distressing ink
Accessories: Large and small Stampin Up oval punches, 1 ½”, 1”, ½”, ¼” 1/8”, 1/16” circle punches, maple leaf punch, cutting scissors, black and Garden Green markers, sponge, cuttlebug, Fiskars – grass template, tacky glue, double sided tape
Techniques: Direct to paper, ink distressing, free hand cutting
Registered: January 6, 2007 Location: Ohio Posts: 293
Wed, Sep 05, 2007 @ 5:10 PM
Too cute! I really like the weathered pumpkins!
------------------------------ Start by doing what's necessary; then do what's possible; and suddenly you're doing the impossible. ~ St. Francis of Assisi Heidi My Blog My Gallery
Registered: February 8, 2005 Location: Niagara Falls, Ontario Posts: 1148
Wed, Sep 05, 2007 @ 5:21 PM
What an awesome card! You did a fabulous job on this.
------------------------------ "Motivation is a fire from within. If someone else tries to light that fire under you, chances are it will burn very briefly.
Stephen R. Covey