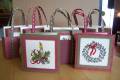
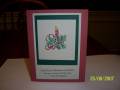
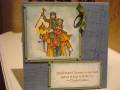
This weekend I got the urge to craft. I had just received the Keep Christmas stamp set and had some of the In Color papers from last year, so away I went. I created 5 mini bags and 40 mini cards. Wow, what a weekend. I stamped the pictures, colored with the markers and then used crystal effects on the flame of the candle and the ribbon of the wreath.
Date: Tuesday, September 4, 2007 GMT Views: 2871
Favorited:46
Registered: February 8, 2005 Location: Niagara Falls, Ontario Posts: 1148
Wed, Sep 05, 2007 @ 5:11 PM
I'd love the instructions for the tote too.
------------------------------ "Motivation is a fire from within. If someone else tries to light that fire under you, chances are it will burn very briefly.
Stephen R. Covey
Registered: February 20, 2006 Location: British Columbia Posts: 96
Thu, Sep 06, 2007 @ 8:23 AM
Thank you everyone for your great comments and encouragement. I don't know how to attach a file, so here are the instructions for the bag:
Mini Bag for 3x3 Love Notes
Stampin� Up�s double-sided paper works well for this project because there is a pattern on both sides. It's also a really nice weight for this project.
These note cards are a nice size and you can make several very quickly. Using the pre-cut and scored Love Notes which are available in the Fall & Winter Catalogue, makes these projects even quicker!
Cut a piece of the Designer Series Paper to 5 1/2" x 5 1/2". Then score it at 2 1/4" from one side, turned it and scored the opposite side at 2 1/4". On the two sides that have not already been scored, scored each in at 1". When scoring on Designer Series Paper, you want to be sure not to push too hard as you may actually cut the paper.
Fold the paper along the score lines, using a bone folder to get a crisp fold. Now cut as shown in the picture - along the 2 1/4" score line until it meets the 1" score line. You will cut four times. You can now form the box, sticking the sides together with adhesive. Double-sided tape or the SNAIL adhesive work well.
Next, put the stamped image on the front and then use a piece of the Stitched Grosgrain Ribbon to form the handle. It's all one piece of ribbon - start at the bottom, wrap it up one side and adhere with SNAIL adhesive in a few spots along the way, make the handle, then continue back down the other side to the bottom where you will wrap it around and continue up the other side of the bag the same way. Use the ribbon right off the spool and cut it at the end so that you use just the right amount.
You can adjust the measurements on these little bags to suit whatever you want to put in them. You might just practice on a piece of photocopy paper first until you get the right dimensions then make your good one...
Hope you all enjoy making these as much as I did. They make a great gift. I have been thinking they would make a great housewarming gift.
Happy Crafting,
Trish.
------------------------------ Trish Everything in life happens for a reason...especially in crafting!
Registered: April 6, 2005 Location: Fargo, don't cha know . . . Posts: 681
Mon, Oct 01, 2007 @ 9:53 AM
Thank you SO MUCH Trish for sharing your directions. I can't wait to try making these adorable little bags! I'm thinking these would be great teacher-gifts for my kids' teachers this Christmas. A little bag with some coordinating notecards. . . wow, who WOULDN'T love these!
Again, thanks for the inspiration! You do really nice work.
------------------------------ Deb - Stampin' in Fargo
- Teacher 19 yrs, SU Demo 2 yrs
Life is short. . . pray hard!