Other:
Sizzix Die Flower Power #2, #38-0989
Embossing tape #99538 (Sparkle N Sprinkle)
Crystal 3-D lacquer (available from local craft store)
Glitter Sunny Daze, #G1038 (Sparkle N Sprinkle)
Double-sided tape
Light blue dye ink
Basic black dye ink
Teal dye ink
Watercolor pencils
Blending pen
15 buttons
Glue
Card Construction
1. Cut four 3” x 6” pieces light teal card stock.
2. Score each piece 1-½” from both ends and fold toward the middle. Crease thoroughly. Unfold, then crease from the opposite side. Repeat creasing, if necessary, to ensure that each piece flexes easily in both directions.
3. Place two of the pieces horizontally on work surface. Place the other two pieces vertically on top of them. “Square” all four pieces so that the outside edges are closely aligned. At this point, it is critical that the crease lines of the top two pieces butt together precisely. The outside edges can be trimmed later, if needed.
4. Place one or two small pieces of embossing tape between each of the four outside corners of the “squared” assembly to fasten all four pieces of card stock together.
5. The base of the card construction is now complete.
Next, prepare the following:
• 10 each: 1-¼” x 2-¾” pieces light blue card stock.
• 12 each: 1-¼” square pieces light blue card stock.
• 6 each: 2-¾” square pieces light teal card stock.
• 10 each: 1” x 2-½” pieces white card stock
• 1 each: 2” square piece of white card stock
• 8 each: 1” square pieces white card stock
• 6 each: 2-½” square pieces white card stock
• 24 each: Sizzix flowers, cut from dark teal card stock
Before proceeding, carefully plan the placement of the stamped images or photos on each piece of white card stock before actually placing them, as the vertical/horizontal orientation of each piece may change as the card is “flipped.” It may be helpful to step through each of the four “flips” before you stamp or add details to ensure you attain the outcome you desire.
CARD FRONT
1. Use double-sided tape to fasten the six light blue panels (four 1-¼” x 2-¾” pieces, two 2-¾” square pieces) to the card face.
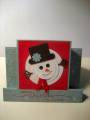
2. Apply texture to one 2-½” square piece of white card stock using a crumpled piece of scrap paper. Dab it in light blue ink and lightly apply to the card stock. Then stamp the sentiment using black ink.
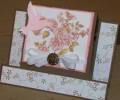
3. Apply the flower stamp and color a second 2-½” square piece of white card stock.
4. Apply texture the 1-¼” x 2-¾” pieces of white card stock using the method above. Then apply border stamp using teal dye ink.
5. Center and fasten all six stamped pieces to the six light blue panels on the card face using double-sided tape.
FIRST FLIP
1. Use double-sided tape to fasten the eight light blue panels (two 1-¼” x 2-¾” pieces, two 2-¾” squares, four 1-¼” squares) to the opened card.
2. Stamp and color flowers, as shown, on two 2-½” square pieces of white card stock.
3. Apply three Sizzix flowers to each of four 1” squares of white card stock. Layer flowers, with a button on top of each set, and fasten using glue.
4. Apply texture to two 1-¼” x 2-¾” pieces of white card stock. Apply a border stamp to one of the pieces, using teal dye ink, and glue three buttons on top, spacing them evenly. Stamp the sentiment, using black ink, on the second piece.
5. Center and fasten all eight finished pieces of white card stock to the eight light blue panels using double-sided tape.
SECOND FLIP
1. Use double-sided tape to fasten the six light blue panels (two 1-¼” x 2-¾” pieces, four 1-¼” squares), as applicable. (The extreme left and right panels were established in the previous flip.)
2. Stamp and color flower on 2” square of white card stock; cut into four 1” squares. Fasten the four pieces, maintaining the relationship of each, to the two vertical two 1-¼” x 2-¾” pieces of blue card stock using double-sided tape. If a “window” effect is desired, space the pieces so that there is more room at the bottom of the light blue card stock that at the top or in the middle.
3. Apply three Sizzix flowers to each of four 1” squares of white card stock. Layer flowers, with a button on top of each set, and fasten using glue. Center and fasten the finished pieces to the four light blue 1-¼” squares at the top and bottom of the card.
THIRD FLIP (Back of card)
1. Follow same directions as for the card front. The only difference will be the placement of the panels. (Refer to example.)
2. When finished, flip the card one more time to return to the card front.
Final instructions
Embellish the card as desired using glitter and crystal lacquer to highlight various parts of the flowers. Be sure to allow each card face presentation to dry thoroughly before proceeding to the next.
Complete instructions for this project may be viewed online at www.hgtv.com as it was featured on the Carol Duval Show, episode CDS-1452. This is my version of the card using Sparkle N Sprinkle design elements.
Loretta Rodger
Designer, Sparkle N Sprinkle
Date: Wednesday, July 18, 2007 GMT Views: 657
Favorited:13