-Cranberry Adirondack Dye Ink and Pigment Pen (Ranger)
-Creamy Brown Fluid Chalk Ink (Clearsnap)
-Noir Black Palette Hybrid Ink (Stewart Superior)
-Super Fine Detail Clear and Seafoam White Embossing Powder (Ranger)
-Canvas Scalloped Circle (Technique Tuesday)
-Create-a-Cut - Scallop Blade
-Glossy Accents (Ranger)
-Paper piercing tool
-Blush Red Dark card stock (Prism)
-White Stripe and White Mini Dot Kraft Paper (Making Memories)
-Silver metal sheeting (K&S Metals)
Design Notes:
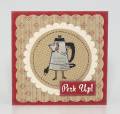
I had one of those giddy feelings when I realized that I had some metal sheeting in my stash. My grandma used to have a metal electric coffee pot that looked just like this! The image was stamped on the metal sheet first, the body cut out, stamped again on patterned paper and then the metal cut out adhered over the 2nd image.
The polka dots were showing through the handle and cord of the coffee pot, so I used a black pigment marker to color over the area a few times. The image was heat set and then the black portions were covered with Glossy Accents to give them some dimension, just like a handle or a cord.
The fabric scallops are sold with an adhesive backing (so nice) on a sheet with several sizes. You can take a look at them on the Technique Tuesday website. www.techniquetuesday.com
Lastly, Creamy Brown Chalk ink was used to bring the red card stock together with the kraft tones. I know you can go direct to paper with the Cat Eye size, but I still prefer a sponge dauber or Cut 'n Dry Foam sponge by Ranger - there is just better control if you want a really soft, even effect.
Date: Tuesday, June 26, 2007 GMT Views: 560
Favorited:6