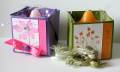
I cut an oval from each of 4 coasters, then ran each one through the cuttlebug divine swirls embossing folder. Next I attached a piece of vellum to the back sides of the coasters. I sponged each coaster with Brilliance sky blue ink, then stamped the butterfly/dragonfly on each vellum window. Colored the images with markers from the back side, then sponged the edges of both sides of each coaster with the blue ink to soften them. I edged the front of each cut oval with an outline sticker border in silver, and then punched each coaster on the 2 sides, with holes. I threaded silver ribbon on each corner of the votive and tied bows at the top of each corner.
I sure am pleased with how this one turned out.
Date: Tuesday, June 5, 2007 GMT Views: 994
Favorited:32
Registered: November 9, 2004 Location: Green Bay, Wisconsin Posts: 150
Tue, Jun 05, 2007 @ 5:51 PM
to cut the ovals, I used my Fiskars shape template, drew around the oval size I wanted, then cut it out with an exacto knife.
HTH
Hugs from the kamperstampr
Registered: March 17, 2006 Location: Heaven - Buried under a mountain of paper scraps and stamps! Posts: 2069
Tue, Jun 05, 2007 @ 6:09 PM
Great idea!! Love how this turned out.
TFS
Cathy
------------------------------ "Promise me you'll always remember: You're braver than you believe, stronger than you seem, & smarter than you think."-- Winnie the Pooh MY BLOG in progress
Registered: March 17, 2006 Location: Heaven - Buried under a mountain of paper scraps and stamps! Posts: 2069
Tue, Jun 05, 2007 @ 6:09 PM
Great idea!! Love how this turned out.
TFS
Cathy
------------------------------ -small">"Promise me you'll always remember: You're braver than you believe, stronger than you seem, & smarter than you think."-small">-- Winnie the Pooh