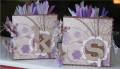
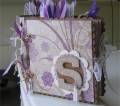
I was really happy with how these turned out. They are a 6x6 book I learned to make from Donna Downey back in Feb. The front and back covers were made using 6x6 pieces of chipboard. I used 2 pieces per cover since the chipboard I had was thin. Use a glue stick to adhere the 2 pieces together. I then covered one side of the chipboard with the patterned paper. The paper is by Daisy Bucket Designs, their Whimsical Ladies line and is so cool. They have multiple patterns so I was able to use 6 different sheets for the inside pockets. Before I glued the inside cover on I made the spine which consisted of a piece of coordinating paper 6" wide and 12 inches long. I scored this at approximately every 3/4". Depending on how many pages you want to include in the book (I did 6) you most likely won't need the entire 12" but you can cut it off once you figure out how many pages you want. Better to be safe than sorry!!!
Once you have your spine how you want it, you will tuck the ends to go flat against each cover (front and back). You can use your glue stick to stick it down. If you want to put a ribbon on to tie the book closed, do this now. I used a piece of scotch tape to tape it down and also used my glue stick. Once you have done this you are ready to put the inside covers on. I cut 2 pieces of coordinating CS (I used brown Bazzill) approx. 6 1/2" x 6 1/2". I then used my cover as a guide and cut with the scallop scissors around 3 sides leaving a nice scalloped edge. The 4th side will be flat and butt up against your spine. Once you have done this you can use your glue stick to stick it down. Do the same on the back cover.
If you would like directions on how to fold the pages, let me know and I will email it to you. Basically, you use a whole piece of 12 x 12 sheet of DP per page. This gives you 2 pockets, one on each side. When I put the pages in, I used a little sticky strip on the spine to hold the pages in place when I drilled the holes. Once you put your pages in, you can drill your holes.
I made 2 of these, 1 for each of my kids teachers for teacher appreciation day. I made tags with coordinating Bazzill CS that measured 2 3/4" wide and 5 1/2" long. I had all the kids write notes to their teachers and then I stapled some ribbon on the top and put them in the pockets. I also included pictures of some of the functions we have done throughout the school year. I matted the pictures on the same CS as the tags.
I am so glad I did this as the notes the kids wrote to their teachers was unbelievable. They were so sweet and truly love their teachers. My son is in 3rd grade and my daughter is in 1st. I know that the notes will be something the teachers will treasure always. They are both awesome teachers and deserve the kind words!
If you have any questions, let me know as I would be more than happy to help!
Date: Friday, May 11, 2007 GMT Views: 2604
Favorited:23
Ink: Lavender Lace and Taupe from one of my Petal Point Colorbox sets
Accessories: LOTS of ribbon, On Board Simon Lower, Marvy scallop circle punch, Quickutz revolution "Flower" (yes, that is really what it is called), linen thread, word window punch, sponge, purple stickles, dimensionals, glue stick, scalloped edge decorative