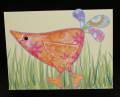
(Note: The card in the magazine was in the shape of the bird, I altered mine to be on a card front.)
So... I cut out the bird parts onto various patterned cardstock. The tail was made of freehand shapes to look like paisley. The eye was a tiny silver brad that I heated with the heat gun and then dipped in black embossing powder (did that a couple of times to get a good layer). I attached the eye to the patterned paper and then I glued all of the patterned paper onto blue cardstock and then cut around the shapes to make one bird. I drew the grass on the yellow card with my SU markers in various green shades. Then I attached the bird.
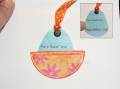
The nest on the inside of the card was made with a 2-1/4" circle that was cut in half. I trimmed down the other half to make a slightly smaller half circle and temporarily taped that to the inside of the big half circle and ran this through the Xyron machine to get a layer of adhesive around just the outer portion of the next. (So I could attach this to the inside and still have a pocket.)
I printed the sentiment on blue cardstock and then trimmed it freehand to look egg-shaped. I attached a ribbon to the top of the egg. The egg is pulled out of the nest to see the "Happy Mother's Day" sentiment.
I used the SU paper piercing mat and the MM piercing tool plus a white gel pen to do the faux stitching.
Date: Thursday, May 10, 2007 GMT Views: 447
Favorited:2