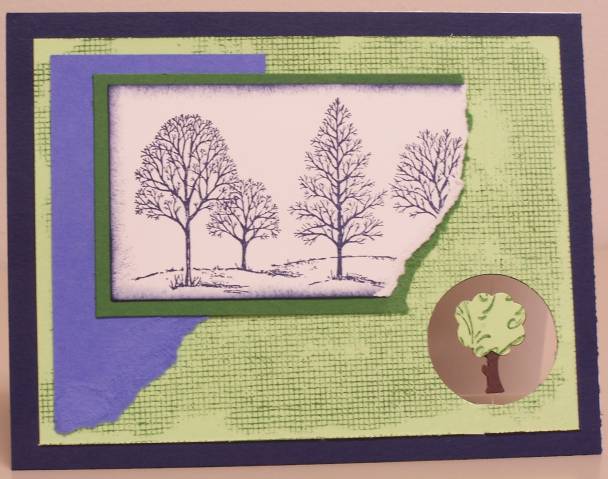
This card was done using one of my very favorite techniques (when I'm strong enought to get the circle or square punch through mulitple layers.) :o) The really cool thing about THIS card is that I used the Filigree BG stamp to symbolize the foliage on the tree!
Date: Thursday, March 15, 2007 GMT Views: 653
Favorited:5
Registered: September 5, 2004 Location: Nebraska! Go Big Red!!! Posts: 54
Thu, Mar 15, 2007 @ 7:44 PM
No need to "figure it out." :o) I'll help you!!
Instructions for this kind of floating image:
1. Stamp the Filigree BG stamp in Handsome Hunter on Gable Green. Then punch 2 trees out of this Gable Green CS (1 with the stamped image facing up, 1 with the stamped image facing down)
2. Punch 2 trees out of Chocolate Chip CS.
3. Cut the treetops off of the Gable Green trees that you punched out. Match the treetops up on top of the Chocolate Chip trees. Glue.
4. Match the 2 assembled trees up to each other back to back. "Sandwich" a piece of clear jewelry filament (about 3-4" long, leaving plenty to adhere to the card) between the trees and glue.
5. For card, line up any mats you are planning to attach to the base piece of CS. DON'T adhere! Hold all layers together and line up your circle or square punch where you want it. Attempt to punch through the layers. If it works, Viola! If not, hopefully you can see the imprint of your attempt and will be able to line each layer up seperately in your punch. In the end, you want all layers to line up.
6. Center the tree assembly in the hole that you punched in one of the pieces of CS. Adhere the filament to the CS so that it is "sandwiched" in between the layers of the card.
7. Layer and adhere as usual lining up all circle or square holes.
Hope you find this useful. And thanks for looking! :o)
------------------------------ Dustina
Rubber Stamping is my passion....but Chocolate comes in a VERY close second!!!
(single and looking) ;o)