Tri Fold card designed to fit in new Su! 3 1/2 X 6 1/2" tall envies. Two sided card stands open for viewing..Exterior (closed view)
Edited to add additional Accessory used: SU! Cutter Kit.
Date: Wednesday, October 4, 2006 GMT Views: 1363
Favorited:40
Registered: August 19, 2005 Location: in my craft room Posts: 1475
Wed, Oct 04, 2006 @ 11:02 AM
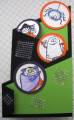
Thanks.. don't know if you can tell from the picture too well, but I positioned the 'peeking' witch so that she is pointing UP at the spider who is about to land on the ghost (ha ha).
The basic idea for a trifold card is available at stampington.com listed under the category 'tempting templates'. They had a template in the January/February 2005 magazine. I re-engineered the card to a new size in order to make it fit well into our Stampin'Up! Small Open End Envelopes as follows to make two cards:
Trimmed a sheet of Basic Black 8.5" x11" cardstock to 8.5" x 10.5"
Along ONE 11" side, I measured up 6" and made a pencil mark, and then on same 8.5" edge, measured and marked DOWN 1.5". On the opposing 8.5" edge, I measured UP 1.5" and DOWN 6".
Then, drew a faint pencil line (diagonals) to connect each 6 and 1.5" marks.
Cut along pencil lines to yield two black trifold backgrounds.
The Basic Black cardstock was then scored/folded parallel to the 6" side at 3.25", 6.5", and 9.5".
On the 1.5" side, I pencilled a 'dot' 1/4" down/up.. Drew lines to connect from the dots back to the first (1") fold, and cut away the excess, resulting turned piece on the front of the card.
A second sheet of cardstock (green galore) was cut to measure 8.5" x 9.5"..
Pencil marks UP/Down were 5.5" and 1". (scored/cut same as above).
The tricky part of the card is lining up both layers so that they fold appropriately...
Registered: August 19, 2005 Location: in my craft room Posts: 1475
Wed, Oct 04, 2006 @ 3:33 PM
Update: used the new Cutter Kit to score the second layer of cardstock, made it align much better/easily. Also used the cutter kit to distress interior message block.. great kit!