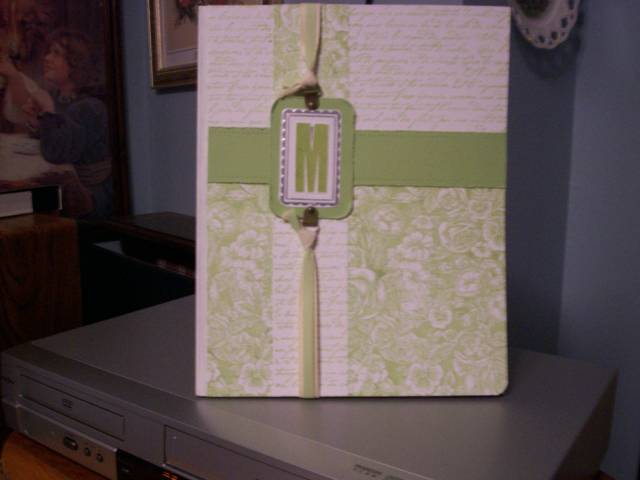
This is a monogram journal I just made with my stamp camps this month. The gals loved it! It is a great way to use large background stamps and showcase a wide variety of products. This is a notebook underneath.
Date: Friday, September 22, 2006 GMT Views: 734
Favorited:18
Registered: July 9, 2006 Location: Friendship,WI Posts: 286
Sat, Sep 23, 2006 @ 7:05 AM
I saw this in Stamp It magazine. I believe it was the Spring 2006 issue. A friend who is on vacation has it right now. I will write out the directions and if you have any questions...email me. I used a mead notebook that I bought at Pamida with a black binding. If you use something different..the measurements may vary. I painted the binding with white acrylic craft paint..2 coats. Then I cut a Whisper White sheet 8 1/8 x 10 1/2 for the front and another in certainly celery for the back. Then on the whisper white I started in the upper right hand corner and stamped with french script, then stamped again in the upper left hand corner. Next ...in the lower right corner...I stamped with floral and again in the lower left corner. Any gaps will be covered with card stock so don't worry about that. Next I took a 2 x 10 1/2 strip and stamped this opposite of the cover..with the floral on top and french script on bottom...see photo. Attach this down the middle. Then take a 1 1/2 x 8 1/8 strip of certainly celery and use paper piecing tool to punch holes across the 8 1/2 length. Use new cutter kit to rough up the length of the 8 1/2 strip. I did not punch holes or rough up the short ends. Attach this. Next cut a 2 1/4 x 3 1/4 piece of certainly celery. Use corner rounder to round edges then rough up with cutter tool. You could also punch holes around this too..but I didn't. Set aside. Then take a 2 1/4 x 3 1/4 piece of whisper white and stamp frame with versamark then emboss with sterling silver. The stamp headline intial in center with certainly celery craft ink. Emboss with Crystal clear. Cut around frame's outer edge..I did not cut around the scallops. Make sure everything is dry so you don't smear before cutting this out. Attach to the certainly celery piece that you just roughed up. Use 1/16 hole punch to punch holes in the certainly celery piece and attach hodge podge hardware. Then I cut twill tape and certainly celery grosgrain ribbon one of each at 5 1/2 and 7 1/2...you now have a total of 4 pieces. Take the 5 1/2 pieces and lay the ribbon over the twill tape. Make a over hand knot to attach it to the hodgepodge hardware. Do the same with the 7 1/2 pieces. Lay this over the top of the 2 x 10 1/2 piece...down the middle and attach to the back with scotch tape. Don't pull too tight..it is better to be a little loose...it won't go anywhere. I then glue sticked the front and back covers to the notebook. There are alot of steps to this project but it gets RAVE reviews and my beginning stampers were able to do this project with guidance.