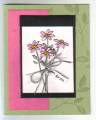
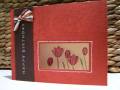
My customers LOVE these slider gift card holders. It's hard to see, but the little flowers from Beyond the Basics are stamped in Bravo Burgandy on the Bravo Burgandy c.s.
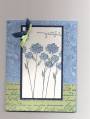
This looks really cute with the coffee cup from Sketch an Event, but alas, it's retired. )-: But if you do use that cup, just stamp the sketchy heart in Bravo Burgundy on the Bravo Burgandy for the background. It matches the heart-shaped steam.
Date: Saturday, July 8, 2006 GMT Views: 974
Favorited:26
Registered: September 2, 2004 Location: The Evergreen State Posts: 11
Sat, Oct 14, 2006 @ 9:17 AM
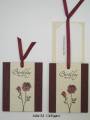
Directions:
To make a slider, cut a piece of c.s. so that it's 4 x 7." That way you get 3 per 8-1/2 x 11."
Score at 3-1/4 and 6-1/2." That will leave a little 1/2" flap to hold it together -- ie put the adhesive on it. Make sure this flap goes INSIDE and they don't just wrap it around the back; that looks bad.
The front decorated piece is 2 x 4."
Inside card is 2-5/8 x 3-7/8" so you can use the corner punch to creat a slot to hold the gift card. This is more narrow than I'd like because then it is wobbly. But you can't go bigger and still get the Simplicity corner punch to work. I have made wider inserts and then used a slit punch instead, but then you have to worry about positioning that because you can't push it in all the way.
Use a 1/4" handheld punch to punch a hole through the holder but NOT the insert that holds the gift card. Yes, the hole is big, but if you use a smaller one, it doesn't slide as easily. You have to fight with it.
Thread a 14" ribbon through the hole, and THEN slide the insert into it. Tie a knot. The ribbon is now wrapped around the insert so when you pull it, the piece slides up.
I don't know if you can see it, but I used the flowers from Beyond the Basics to decorate the Bravo Burg. c.s.