Hi everyone, I made this card for two SCS Challenges: Dini's Dare to Get Dirty and also for the Technique Lover's Challenge TLC973 of Night Sky - see link to the TLC Challenge here ----> TLC973 Night Sky 10/16/2023 by Rebeccaof at Splitcoaststampers
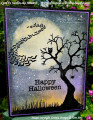
To make the background, I grabbed some Ranger Watercolor Cardstock and used the smooth side. I diecut a circle from 3M Post-It Craft Paper using a Lifestyle Nesting Circle die and my Big Shot so that I could mask off the moon. I then wet the cardstock and sprayed various Dylusions Shimmer Sprays, Ranger Distress Oxide Sprays and Kaisercraft Kaisermist Sprays. I dried the cardstock using my heat-gun and re-did the spraying till I was happy. I removed the moon mask and sprayed water in just that area then sprayed some Antique Linen Distress Oxide spray and just let the colours bleed into each other then dried it with my heat-gun. I was so pleased with how the moon looks - like it is glowing.
I watered down some Jo Sonja white acrylic paint and splattered that over the background using a fan brush and did the same with Jo Sonja pale gold acrylic paint. I used my powder tool on the background then stamped the Lavinia Sacred Tree using Altenew Obsidian (black) pigment ink then heat embossed it using Ranger Black Super-Fine Detail Embossing Powder. Because I wanted some sparkle, I first separated some of the black embossing powder and mixed in some Bellbird Place Diamond Glitter and it worked a treat. I knew that I had some black sparkle embossing powder somewhere - but do you think I could find it?! But tonight, it was in the drawer where I had been looking: go figure!!
I then stamped the Lavinia Grass Silhouette and heat embossed that as well then sponged some of the black ink around the bottom of the cardstock and heat-set that with the same sparkly embossing powder. I stamped the Lavinia Bat Colony over the moon and again heat-embossed it. The owl is from a Hero Arts/Scrapbook.com Greetings collaboration set. The spider and sentiment are from the Hero Arts - Happy Halloween CL353 set. I drew a line from the tree branch to the spider using a Copic Black Multiliner in size 0.3.
I WISH you could see the sparkle - it looks amazing in real life!
I sponged some of the Obsidian ink around the edges of the card which really made a difference to the scene. Once I had finished the panel, I glued it to some Core-dinations purple cardstock and trimmed it to 1/16" using my WRMK Tool - Layers Guide. I glued the purple cardstock to some Kaisercraft Black Glitter cardstock and trimmed that to 1/8" - then popped the card front onto a white card base.
Thanks for having a peek at my card! You are welcome to visit my blog: Instead of Ironing Blogspot - this link will take you to my blog post ---> https://instead-of-ironing.blogspot....y-lavinia
Date: Thursday, November 2, 2023 GMT Views: 539
Favorited:2
Registered: January 20, 2010 Location: Brampton, Ontario Posts: 26180
Thu, Nov 02, 2023 @ 5:17 AM
Your sky is just incredible! Thanks so much for providing the details on how you crafted it. I love the contrast between the moon and sky. Your silhouetted tree and flying bats give it a perfect scary vibe. Wow - love all of this!
Registered: August 22, 2006 Location: Alberta, Canada Posts: 1353
Thu, Nov 02, 2023 @ 10:49 AM
This is amazing! I love your night sky, thank you for telling us how you did it! It turned out so beautifully! And that amazing stamp with the bats looks so stunning against your moon! You've created a gorgeous card!
------------------------------
Leslie
�The best kind of happiness is a habit you're passionate about.� ~Shannon L. Alder