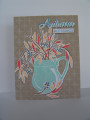
Wow, I was blown away by Micheline's gorgeous gallery! I can't even come close to her talent, so I resorted to cutting my trees, coloring and then applying Frantage embossing enamel. I sure made a mess, even though I knew to heat from the underside, ending up with as much powder on my stamping area as on the trees. I die cut the light blue rectangle, embossed some stars, added some snowbanks at the base and then attached the thin frame and trees. The white panel was embossed with the Sizzix snowy folder and the tree panel attached. Here's Micheline's gorgeous card that inspired me.
Registered: August 21, 2007 Location: Wayland MA Posts: 105266
Sun, Aug 13, 2023 @ 12:17 PM
Sue, your trees have the same feel as the card you cased. Love the framing and bg colors!!
------------------------------ Anne HarmonFS154, QFTD58, PROUD FAN CLUB MEMBER (photo of our Great Granddaughter Elise, just 6 months old) and me, even older.
Registered: June 4, 2009 Location: Deatsville, Alabama Posts: 83521
Sun, Aug 13, 2023 @ 12:50 PM
Sue, your frantage covered trees are just beautiful. This is lovely!!! Hugz
------------------------------ Nancy Williams - Hope your day is Spirit-filled and ink-filled (in that order)!DRS Designs-DT, Punchkateerforever, Dirty Dozen Alumni
Registered: February 19, 2011 Location: Fullerton, CA Posts: 15234
Mon, Aug 14, 2023 @ 1:08 PM
Love how you reframed (literally and figuratively) the inspiration card even keeping both blues and greens on the trees. Those dies are fabulous and the frontage adds such beautiful texture and sheen. But those stars are what really take this over the top. You created a beautiful star lit night in a magical forest. Awesome card.