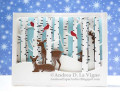
I made this card following a tutorial by Sam Calcott at Mixed Up Craft. She got the idea for the pop-up mechanism from Jennifer McGuire.
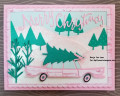
I cut 3 panels of white cardstock. I embossed one, doing faux letterpress by inking up the negative space of one side of the folder with Tumbled Glass & a brayer. Because the ink also colored the markings on the birch trees blue, I went in with a dark grey colored pencil & colored over all the markings.
I die cut all the parts for the birch trees from white & dark grey cardstocks. I also die cut my other 2 panels into frames with a rounded rectangle die. I used the "Snow Drifts" dies to cut 2 hills. I die cut 3 deer from brown cardstock, & the birds from red.
I glued the grey backing pieces behind the white die cut trees, and glued my snow hills behind the 2 frames.
I used a colored pencil to add the white parts to the deer, & a black glaze pen for the eyes.
For the pop-up mechanism, I cut 4 strips to 1/2" wide by 4-1/4" long. I scored each lengthwise at 1/8", 1/4", & 3/8". Then I accordion folded them. Yes, it was VERY fiddly! But they had to hide behind the sides of my frames, & I didn't dare make them wider for fear they would show. I prevailed, though!
I laid the frames on top of my background, & determined where to place all my middle- & foreground elements. I glued the bottom of each tree behind one or the other of the hills, & glued the top behind the corresponding frame. I glued the birds to branches, & glued down the deer. The buck ended up getting kind of hidden behind a foreground tree, but whatever. Then came the really fun part...!
I used liquid glue to adhere each folded "spring" strip to the sides of my frames, making sure they didn't stick out from either side at all. Honestly, that was even harder than scoring & folding them! Finally, when I got them to stick where they needed to be, I glued the other side of the springs on the middle frame to the background, which I'd already adhered to my card base. I repeated the process with the front frame, gluing it to the middle frame. The folded springs give lift when the card is out of an envelope, but (presumably) flatten more or less when in an envelope. I haven't tried it in an envelope yet, so I can't swear whether it works as intended or not. I decided to leave off a greeting, & just put something inside. It took me about 4-5 hours to make, but it is going to special friends, so it is a true labor of love!
Date: Thursday, December 15, 2022 GMT Views: 776
Favorited:9
Accessories: Sunny Studio Stamps "Rustic Winter," Hero Arts "Rounded Rectangle," & My Favorite Things "Snow Drifts" dies; Stampin' Up "Woodland Textured" embossing folder; Prismacolor colored pencils; black glaze pen
Registered: January 2, 2010 Location: Alaska Posts: 1265
Sun, Dec 18, 2022 @ 12:48 PM
Wow!! Beautiful scene & card! Definitely see it is a labor of love, thanks for sharing all of your details in creating it. I love that you added white to the deer, and eyes, so realistic, it makes them pop too. I have that tree embossing folder but have not used it yet. Thanks for sharing that you did a faux letterpress tech to ink the sky and used pencil on the tree after. Inspiring!
Jeremiah 29:11 Splitcoast Dirty Dozen Alumni | Proud FanClub member since 2017
My Gallery | My Blog "The wind of Heaven is that which blows between a horse's ears."