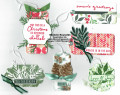
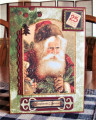
I just made mine as a large, 2-layer tag for on a gift, with room inside to write a note. And I really wanted to use up lots of Christmas paper scraps for this, so I stuck to small pieces of paper that I could use up.
Die cut two 2.25x4.25-inch tags from white cardstock scraps. Score first (bottom) tag at the top, below the angled corners. Add adhesive above the score line and stick second tag on top to create card/opening.
Ink snowflake stamp in Jet Black and stamp randomly on half of top layer of tag. Put a dot of gold fabric paint in the center of each snowflake. Partially die cut (using same tag die) a piece of scrap Christmas paper to fit the length of one side of the tag; adhere to tag front. Trim scrap "Merry Christmas" sentiment strip from paper pack and adhere to tag front with dimensional foam tape.
Die cut pine boughs using scrap Soft Succulent cardstock from portions of the large SU Christmas to Remember die. Die cut the 2 pinecone layering pieces from Soft Suede and River Rock scraps; adhere together. Adhere layered pinecone and pine boughs together on the front of the tag.
Die cut "25" and "th" from scraps of Evening Evergreen cardstock. Adhere to front of tag. Punch hole in top of tag. String antique gold satin ribbon through hole; trim ribbon ends and singe with flame to prevent fraying. TFL! One down....
Date: Monday, November 21, 2022 GMT Views: 362
Favorited:2
Registered: November 12, 2011 Location: Georgia Posts: 3496
Tue, Nov 22, 2022 @ 1:00 PM
YAY! I'm glad you have gotten started with your tags and this is awesome! I Love the black and white side to balance the colors. AND getting to use up scraps...it's like winning again!