I have completed another 10 online classes of the Altenew Educator Certificaction Program and received my Final Challenge for Level 2.
The short form:
Make 4 masculine cards with the following themes: Birthday, Love/Thinking of you, Anniversary, Encouragement and an Altered Item/Upcycled Project.
Select any three components from the classes in Level 1 or 2.
When choosing the techniques I realized how many different ideas, materials and techniques I saw and learned in the classes. But there is another important point in the AECP program that have helped me to improve. I like to look at cards made by others and videos in the internet. Woww, I think thatâs a great idea or technique, I'll remember that, I have to try that. But then I often never try them. In the AECP program I had to design and describe a card after each online class containing six videos. I canât say that I will try it sometime later if I want to make progress. So I'm glad that there is still level 3 and therefore there is still a lot of ideas waiting for me to try.
My attitude towards masculine cards with materials from Altenew has changed completely with AECP. When I was assigned to make several masculine cards in the Final Challenge for Level 1, I was very stressed at first. Not because of masculine cards per se, but because I initially thought of stamps from other companies. When I think of Altenew I think of wonderful flower stamps. But in the meantime I have wonderful stamps, stencils and dies that are perfect for masculine cards. This time I was very happy when I received my current challenge. Hopefully you can see from the cards how much fun I had.
My choice of classes/techniques:
Impressive Heat Embossing: different embossing techniques
Celebration - Stencil Techniques: different techniques with stencils (I love to work with stencils and I always get new ideas, see current Altenew stencil release)
Let It Shine: Use of glitter and shine (also suitable on masculine cards)
The exact description of the techniques can be found on the respective cards. To shorten this blogpost I only list the materials used in the description.
1. Masculine card with the theme "Birthdayâ
I stamped the motifs from the Altenew stamp set "Happy Birthday to You" with black Versafine Clair on white watercolor paper (Florence). Since I worked with acrylic blocks and stamping a second time like when using a stamping platform was not possible, I reworked small areas with a black fineliner from Edding.
With a Washi Tape I attached the Altenew "Bubble Wrap" stencil to the top of the watercolor paper and I also taped some parts of the stencil for protection. Then I pressed Versamark embossing ink through the whole stencil directly onto the paper.
After removing the stencil, I sprinkled four different Distress Embossing Glaze colors (Broken China, Wheathered Wood, Fossilized Amber and Pealed Paint) with a small spoon over it, removed any excess powder with a brush, and then melted everything with the heat gun. Because Distress Embossing Glaze is transparent, you can see the writing and the notes very well after melting.
I die cut the clef from the Altenew set "Treble Love" out of blue and gold Mirror Carstock and attached it. This gives you two usable clefs, so I made a second card. Here are some additional sentiments from the Altenew set "Say it with Love" stamped in the background. I die cut the background with a "Stitched Rounded Square" die from Elizabeth Crafts and glued it on a 15 cm x 15 cm card.
2. Masculine card with the theme "Loveâ
After one "trial stamp" (to discover the correct arrangement) I stamped the two cups and the coffee stains from the Altenew stamp set "Coffee with a Splash" on white watercolor paper (Florence) with black Versafine Clair. With a black marker and a ruler I drew a line which represents a table edge.
Then I attached the Altenew Stencil "Beveled Squares Stencil" to the paper with Washi Tape. Below the âedge of the tableâ I wiped the "tablecloth" with a Blending Brush and Distress Ink "Speckled Egg".
I colored the saucer and the inside of the cup with a Versamarker, which contains embossing ink, then I sprinkled Distress Embossing Glaze "Tattered Rose" on it and embossed it with a heat gun. I did the same with Distress Embossing Glaze "Fired Brick" on the outside of the coffee cups, and again with Walnut Stain on the coffee stains. I'm really excited because the coffee cups almost glow.
I cut a stencil out of a piece of vellum to protect the table and cups and put it on top. Then I dabbed the Altenew stamp "Rustic Linen" with Versamark and stamped it to create a wall, and embossed it for the shine with Wow Embossing Powder "Metallic Platinum Regular".
The word LOVE I die cut with the Altenew "Bold Alphabet". Then I stamped coffee stains on the letters and attached them on a sticky strip of masking paper to make embossing easier. Then I embossed the letters twice with Distress Embossing Glaze "Fired Brick". The color glows brightly.I die cut the letters out of black card stock and attached them slightly offset behind the red letters to create a shadow effect.I stamped the sentiment from the same coffee set with black ink on white paper, die cut it and attached it with Craft Foam. I die cut the background with a "Stitched Rounded Square" die from Elizabeth Crafts and glued it onto a 15 cm x 15 cm card.
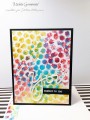
3. Masculine card with the theme "Encouragementâ
I changed my original plan. Actually I wanted to use more blue and grey shades for this card. After three attempts I knew it had to be more colorful, even for men. The theme of encouragement, energy, love of life should be represented by the colors.
I attached the Altenew stencil "City Scene" with a Washi Tape on a white watercolor paper (Florence). With a spatula I applied Decofoil transfer gel, making sure that there was no sharp edge as you will see in the pictures. I let the gel dry completely.
Then I folded pergament paper, put the watercolor paper in it and on top of it a piece of "Rainbow" Decofoil with the shiny side up. I put the whole thing through the laminator with the folded side first.
After cooling down I carefully peeled off the foil and you can clearly see the tapered edge. The rainbow colors are shiny and wonderful. I die cut the background with a "Stitched Rounded Square" die from Elizabeth Crafts.
For this card I used scissors to cut the stencil. There is so much unnecessary packaging waste, especially in the crafts sector, that I often try to re-use packaging. Here the original packaging is a stable plastic foil on which I drew clouds with a permanent marker and then cut them out with scissors. With a Blending Brush, Distress Ink "Tumbled Glass" and my stencil I created soft clouds. Always shift the stencil down and then left or right to create the next row to make the clouds look more natural.
I die cut the word YES with the Altenew "Bold Alphabet" (for a powerful size) and then attached the letters on a sticky strip of masking paper to make embossing with the heat gun easier. I tried different white embossing powders until I was satisfied. The winner was "Embossing Tinsel Bridal" by Ranger which also had some glitter elements in the powder. I hope the name of the powder will not have give me bad reviews, since I am supposed to make men's cards after all!!
The encouragement sentiment comes from the Altenew set "New York", which I bought mainly because of the sentiments included. I stamped the sentiment with black Versafine on white watercolor paper, die cut it with a die from the Altenew set "Featured Sentiments" and then attached it to the card with foam tape.The background was attached with Craft Foam to a square 15 cm x 15 cm card.
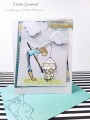
4. Masculine card with the theme "Anniversaryâ
I started this card on a relaxed afternoon. I had some older, already slightly dry mini ink pads from various companies: too dry for stamping and a shame to throw away. So I spent an hour with these mini ink pads wiping stripes, circles, areas for backgrounds directly on white cardstock until there was no color left. On one of these backgrounds I attached the Altenew stencil "Feathery" with Washi Tape and wiped Distress Oxide "Faded Jeans" and "Black Soot" on it with a Blender Brush. Then I used the black Altenew Artist Marker to add a black border to the feathers. Afterwards I put the stencil on it again and used the Altenew stamp "Rustic Linen" with Versamark to add a little structure to the feathers and embossed the result with gold embossing powder. Since the stamp is very large, I used only a part of it by bending it while stamping. I die cut the background with a "Stitched Rounded Square" die from Elizabeth Crafts and attached it to a 15 cm x 15 cm card. The Altenew "Happy" was die cut from gold mirror and black cardstock and I attached them to each other slightly offset. The word "Anniversary" is in the Altenew stamp set "Mega Greetings 2", stamped with black versafine on white cardstock, die cut with a die from the Altenew "Featured Sentiments" and attached to the card with foam tape.
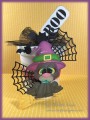
5. Altered / Upcycled Project
The basis for this project were the classes "Celebration - Stencil Techniques", "Let It Shine" and "Clean and Simple". These beautiful wooden chocolate boxes are far too good to throw away. They are perfect for mini ink pads, markers, die-cuts and much more. I had a specific color idea and tried it on several small pieces of wood until I was satisfied. I started coloring the box with the transparent acrylic paint "Burnt Umber" from Amsterdam, which I applied directly onto the wood with a sponge (a kitchen sponge cut into small pieces), then I applied "Marbles" Fresco Finish Chalk Acrylics from PaperArtsy, then "Cyan Primaire" and "Ultramarine" from Amsterdam and finally "Lapis" Heavy Body Acrylic Paint from Dina Wakley. I wiped each color with these small sponges in stripes directly onto the wood until I was happy with the result. Between each step I let the paint dry.
Afterwards I cut a white cardstock to the size of the box and with a ruler I determined the center to correctly position the Altenew "Mandala" die. I attached the die with Washi Tape to avoid slipping and used the Big Shot to create a stencil. I sprayed the back of the resulting stencil with 3M Spray Mount (removable) to prevent paint from running under the stencil and attached it to the top of the box. I wanted a shiny gold for the mandala and my colors and pastes were very different, so I again tested them on the small pieces of wood. The winner was my oldest gold color from Lukas âWipe Metal Gold". I dabbed the wipe metal with a sponge through the stencil until all areas, even the smallest holes, were completely covered with gold. Then I carefully removed the stencil and let the box dry overnight.
I hope I was able to inspire you a little bit. Gabriele
Date: Saturday, October 3, 2020 GMT Views: 723
Favorited:2
Oh Gabriele!!! You outdid yourself! I was over at your blog looking at the process photos and reading through the post, it felt like I was there with you. I had so much much reading the details and your thought process. I love every card you made! They are all unique, one of a kind and truly fantastic! You worked hard on each design, I can tell this! Absolutely splendid job my friend!! You aced it! The box also looks incredible with the antiquing you added using burnt Amber colour with the blue hues, magnificent!
Thank you for entering your work to the AECP assignment gallery. Bravo!