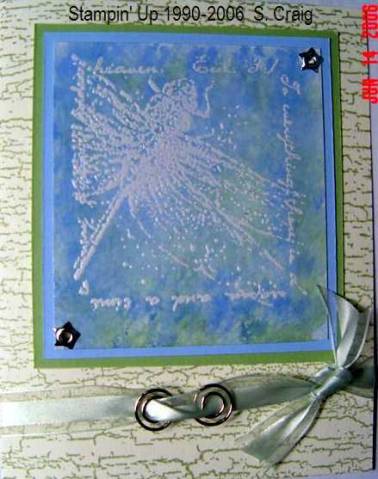
A special thanks to Vickie Maduzia for sharing her Maduzia Magic technique with me. I was able to make cards for our card ministry which will be given to two pastors in our church who will use them to encourage those who need it. I am so thankful that people like Vickie so willingly share their ideas, gifts and talents with us here on SCS, so that people like me can make cards and give them to others who will use them as God sees fit. Thank You Vickie and all of you other women who give so willingly to this site and its members.
Date: Wednesday, June 14, 2006 GMT Views: 433
Favorited:5
Registered: March 9, 2005 Location: OH Posts: 28546
Tue, Jun 20, 2006 @ 12:04 PM
Butterfly Maduzia Magic
A special thanks to Vickie Maduzia for sharing her Maduzia Magic technique with me. I was able to make cards for our card ministry which will be given to two pastors in our church who will use them to encourage those who need it. I am so thankful that people like Vickie so willingly share their ideas, gifts and talents with us here on SCS, so that people like me can make cards and give them to others who will use them as God sees fit. Thank You Vickie and all of you other women who give so willingly to this site and its members.
Techniques: Maduzia Magic
I tried to post the link, but it wouldn't work so here's the technique. If you do a search in the gallery section of this site, you'll see some more wonderful samples of her work. Good Luck.
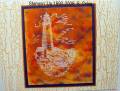
Vickie�s Magic Snowflake Card
Supplies used: Snowflakes, All Year Cheer I stamp sets. White craft ink or Versamark; Classic Reinkers in Ballet Blue and Night of Navy. White glossy, Night of Navy and Brushed Silver Metallic cardstocks. Winter White embossing powder, Heat embossing tool, Cotton balls, Rubbing Alcohol, Silver embossing powder (for the greeting) and silver mini-brads.First, stamp your big snowflake with either Versamark or white craft ink, onto a 3.5" square of white glossy cardstock. Sprinkle winter white embossing powder over it and heat emboss the snowflake.
Then to do the polished stone technique, you take a cotton ball and half-way saturate it with rubbing alcohol. Holding the wet cotton ball face up, carefully squeeze out 2 drops of ballet blue classic reinker onto the left top portion of the cotton ball, then 2 drops of night of navy reinker on the right. Think of a #4 domino, that�s what it will look like, 2 drops on each side.
Now just start dabbing the wet cotton ball all over the piece of glossy, until the square is completely covered with color. It will be very messy looking, and stinky! And your customers will think you are crazy� it looks like you have made a tragic mistake!!
Then comes the "Magic" part! Get your embossing heat tool out again and point it right at the center of the snowflake ... and oh my gosh ... the snowflake emerges out of the murky inky mess!! It really does look and feel like magic!! Move the heat gun around slowly and heat it completely till all the ink evaporates and the snowflake looks white and pretty again. Let cool, mount on silver and finish card. For added sparkle, you can also touch up the snowflake with a 2-way glue pen and glitter.
I hope you enjoy this project, it is a really fun "wow" card to demo. I discovered this "evaporating" part by accident last year and have had a great time with it, it is so fun to demo this for customers!! You may know that sometimes polished stone uses a metallic re-inker in addition to the other two colors� but please DO NOT use metallic ink with this project, or the encore ink will get embedded into the snowflake and will look very icky.
All these snowflake projects are so special to me� I was working with this set last year at a time when I was going through a very sad time in my life. As I prayed, and pressed through the pain, I thought about how all beautiful snowflakes really start out as rain � this made me feel better and I began stamping snowflakes all over everything, and all the time praying that God would someday turn my sadness into something beautiful and peaceful, like a snowflake. And He did! Now I�m on the other side of all that, and it is so awesome to have others who are now enjoying my little snowflake creations! They were born out of pain, but today they are a source of great joy! Hope you enjoy this project and that it brings you success in your stamping business! I would love to hear back from you after you do this, and would be so delighted if you could send me a scan or a card to show me what cool things you can do with this technique! Thank you for your interest in my little projects J Good luck and happy stamping!
Vickie Maduzia
Stampin� Up! Demonstrator/Supervisor
1722 Trowbridge Street, Garland TX 75044
972-495-6503 [email protected]
------------------------------ My Blog- Trusting in the Lord for Everything Proverbs 3:5-6 Trust in the Lord with all your heart and lean not on your own understanding. In all your ways acknowledge Him and He will make your path straight. My Stampin' Up WebsiteMy Gallery, BRAK New Member Mentor. New Grandmother to Mia Lou. 1st Grandchild.