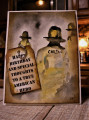
My sister-in-law's birthday is coming up soon, & I wanted to make her a special card. So I pulled out my "Magic Picture Changer" die set & "Birthday Before 'n Afters" stamp set and went to work.
I cut 2 pieces of Strathmore Smooth Bristol paper large enough to accommodate the "Magic Picture Changer" & the frame from the "Magic Picture Changer Add-on" dies. I marked where the window would be on each piece, and used those marks as a guide to stamp my images. I stamped the wrapped present on the main panel, & the corresponding image on the other panel. I used a black felt-tip pen to draw lines for a baseboard on each panel, and then masked my present & the lower part of my scene. I inked the top "wall" part with Speckled Egg, moved the tape mask to cover the wall & baseboard, and inked the floor with Gathered Twigs. Finally, I removed both my masks and colored the present & baseboard with Tombow markers. I repeated the process for the other panel.
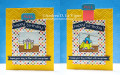
I die cut a piece of patterned paper from my scrap stash with the "Magic Picture Changer Add-on" frame die. I assembled the magic picture changer, and adhered my frame to the front. For the background, I embossed a piece of yellow cardstock with the "Chevron" embossing folder. I white heat embossed my greeting, from "Birthday Before 'n Afters." I cut the happy birthday words into labels, and the secondary greeting into a narrow banner shape, and glued them in place. Finally, I adhered my magic picture changer to the background, and mounted my card front onto a white A2-size card base.
Date: Tuesday, September 15, 2020 GMT Views: 249
Favorited:2
Accessories: Lawn Fawn "Magic Picture Changer" & "Magic Picture Changer Add-on" die sets; Park Lane "Chevron" embossing folder; Tombow markers; Ranger White Super Fine Detail embossing powder