I have now completed the 19th online course of the Altenew Academy in the Altenew Educator Certification Program, and I would like to show you my project.The topic was "Masking Unleashed" and Svitlana Shayevich gave an overview in 6 lessons of different masking techniques with numerous tips and tricks.
Of course, I immediately chose a technique for the project that I had not tried before: Masking with Freezer paper. I didn't even know that you can use Freezer paper for stamping, but now I think that we can somehow use almost everything for stamping.
Freezer paper has a normal paper layer on one side and a plastic layer on the other side. Though it is used for freezing food, I have discovered that there are many possible applications. So first of all I bought Freezer paper, which is available in a roll as well as in single sheets.
The mask out of Freezer paper is made in the same way as from other masking papers, i.e. the mask is cut or punched out with scissors or dies. If you want to work with a "dry" paint, normal paper or self-adhesive masking paper can be used for masking. If, however, you want to work with watercolors, for example, the mask made of normal paper is soaked and the edges become leaky. Therefore the Freezer paper is the better choice. The plastic layer of the Freezer paper is fused to the paper to be painted by ironing it which prevents the paint from running under the edges. That is the theory and that is what I saw in the video.
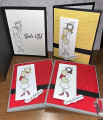
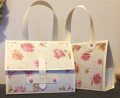
I have made many attempts to create the âperfectâ card for this project, and I want to share my experiences with you. I will show you step by step in many pictures one of the not so successful attempts, but since the technique is always the same, I use these pictures anyway. I was disappointed at the beginning that I didn't get the expected outcomes, but I used all the results to make cards. I like them all, even the "not so successful" ones, and it was really fun to experiment. The three dies I used are from the Altenew set "Spring Roses".
Procedure:
1. I thought about how I wanted the finished card to look and where I should place the dies on the Freezer paper.
2. I die-cut the mask out of the Freezer paper with the dies and put the Freezer paper with the plastic layer down on the paper for the card.
3. I put parchment paper over it and ironed the Freezer paper to fuse it to the paper.
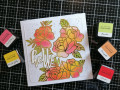
4. I dabbed various Altenew dye inks on an acrylic block.
5. I sprayed some water on the acrylic block with a Minimister and pressed it on the "mask holes". I repeated this procedure several times until I was satisfied with the colors.
6. For the leaves I went through the same process with a small acrylic block so I could target better.
7. To remove the Freezer paper, it has to be heated bit by bit with a heat gun, so that the plastic layer melts and can gently be separated.
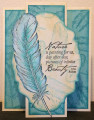
8. Here you can see the result. Ohhhh I was disappointed. The paint escaped through the edges.
9. So I thought let's try again. Perhaps I had not ironed enough. And how I ironed on the next try! I fused the papers so much that I could not separate the Freezer paper and the panel afterwards. It tore and looked terrible at first. But I had a Tim Holtz stamp from the set "Faded Type" on the table, stamped the letter stamp several times with Versamark on the torn background and embossed this with Distress Embossing Glaze. And I was reconciled with my âdisasterâ.
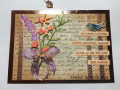
10. One of my next attempts was really successful, as I had hoped. My summary: It all depends on the paper used. The first attempts were made with a very soft watercolor paper, so the colors leaked through despite the Freezer paper. A smooth, firm cardstock delivered the "successful" result. This is how it should look. Now I am excited about using this technique in the future.
11. I die-cut the Altenew "Spring Roses" from golden Mirror Cardstock and attached them on the suitable places.
To finish the cards I used the following materials:
Altenew âSpring Rosesâ dies
Altenew âHello and Hugsâ stamp set and dies
Altenew âBold Thanksâ dies
Altenew âRustic Linenâ stamp set
Altenew âRed Cosmosâ Enamel Dots
Sizzix âTag Collectionâ dies
Tim Holtz âFaded Typeâ stamp set
Tim Holtz Distress Embossing Glaze
Golden and red Mirror Cardstock
Stick-It
Please never be discouraged if a technique does not work out right away. Failures are often due to the materials. And if it did not work out, think about how you can still use the results for cards. There are soooo many possibilities.
In the future I will of course use the "right" paper for this technique, but I have also photographed the other cards to show that very unique cards can also be created.
One more little tip: The best way to remove the Freezer paper is to use a flat metal object like a knife to lift the Freezer paper while you are heating it with the heat gun.
Have fun trying out this technique
Gabriele
Date: Thursday, July 16, 2020 GMT Views: 206
Favorited:3
WOW! The colours and that gold! Stunning, Gabrriele! I absolutely love it. And as always, a very well-written post!
Thank you for entering your work to the AECP assignment gallery.