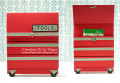
My brother likes to build model airplanes. I found this gift card holder through Pinterest, and wanted to make my own version for him. Thankfully, the woman who posted it provided measurements & instructions on her blog! I figured a tool chest would be apropos for a hobby shop gift card.
I cut my cardstock pieces following her measurements. I was able to get all the red pieces out of one letter-size sheet of cardstock, with a little left over! The silver & black were from scraps in my stash.
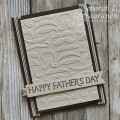
I used a 1/2" circle punch for the wheels. In the tutorial, she made the card base to where you could open it. I didn't want that, so I added a folded cardstock strip to the inside bottom edge of the front & back of the base. (I adhered one side of the strip inside the front, & one side to the back of the card base.) That way, it can still stand, but doesn't open all the way.
I also couldn't figure out how she did the drawers exactly. It seemed like they were slightly spaced apart, but the gift card didn't show through from behind them. She also mentioned adhering the bottom drawer with adhesive on the sides & bottom, so the gift card would fit in, but the other drawers she said just adhere with foam tape. I understood that to mean foam tape all along the back of those drawers, which didn't make sense to me. So I adhered my 3 drawers to the leftover piece of red cardstock with foam tape, and then added more foam tape to the sides & bottom of that backing piece. Then I stuck it to the card base.
For the brackets on the wheels, I cut two 1/2" squares from silver cardstock. I cut each in half diagonally, and glued them in place overlapping the tops of the wheels.
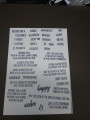
I stamped the word "tools" in Jet Black ink onto another strip of silver cardstock, & heat set it so it wouldn't smear. I actually had to cut the strip slightly longer than in the instructions, to accommodate my larger stamps, plus have room to add a mini brad to each end. I matted that with black, added the brads, & attached it to the tool chest "lid" with double-sided tape.
I added a larger silver brad to the center of the lid. I stuck the magnet for the closure to the prongs of the brad, and applied a bit of E6000 glue to the other side of the magnet. I closed the lid flap, clipped it with a couple of binder clips to keep it closed, and left it for 24 hours for the glue to cure. I really love the way this turned out, and hopefully my brother will also appreciate it!
Date: Tuesday, November 19, 2019 GMT Views: 856
Favorited:6
Registered: March 30, 2008 Location: Somewhere between the Shire & Mordor! Posts: 4642
Tue, Nov 19, 2019 @ 11:45 AM
OH THIS IS SOOO COOL for a Masculine Gift Card Holder! I THINK, your brother is going to LOOOVE THIS!!!! ( Can you hear me singing that???)LOL A SUPER JOB on your gift card!!!! ;)<3
Registered: August 1, 2006 Location: Missouri Posts: 26798
Thu, Nov 21, 2019 @ 7:02 PM
Oh wow, this is awesome. I can see making a couple of these for my boys and husband. Thanks so much for playing along with my challenge and sharing this fabulous gift card holder. Blessings.
Oh Sis Andrea I totally love love this!!! I always make tool box sidestep cards for all the me In my life for everyone of them are all mix it yourselfers lol many are jacks of all trades but I say master of non Hahahaha. Nah they all are amazing men if. It I wouldn't waste my paper on them right? ROFLMBO. This is definitely in my wheel house of A Fairy Magnificent Masterpiece!! Would love your instructions!!