Another no-fail technique that creates beautiful background papers... ranging from bold & strong to soft & faded.
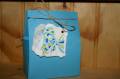
Create marbled sheets of CS (how to is below). Silhouette-style images are then stamped in black ink. Salutation can be stamped next (or stamped on scrap CS to be cut out and adhered afterwards). The stamped-marbled CS is then trimmed down so there will be a natural border once it is adhered to the cardfront.
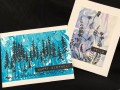
My take on creating marbled paper from shaving cream (foamy type from an aerosol can, not gel).
1) Apply shaving cream to paper plate or pan then spread to make an even layer that's larger than CS to be marbled.
2) Using at least 2 colors of reinkers, add/scatter drops evenly over the layer of shaving cream.
3) Use a stick or toothpick to swirl and spread the drops of reinker across shave cream.
4) Lay and gently press the piece of CS over top of the shave cream.
5) Lift the CS off the shaving cream and set it down with shave cream 'up' on a clean flat area. Use a credit card or squeegee to scrape across the CS to remove the shave cream.
6) Set aside to dry before stamping any images.
Additional comments:
-- you may be able to pull a few more images from the shaving cream... use the stick to move it around to fill gaps or holes as needed. Each successive pulled image is lighter than the previous image. I'm able to pull 3 to 4 images per plate of shave cream.
-- my general color preferences for this are to use 2 colors that are near each other on the color wheel.
Date: Sunday, July 14, 2019 GMT Views: 418
Favorited:3
Registered: March 8, 2005 Location: Halfway between Dallas and Houston Posts: 24020
Sat, Nov 07, 2020 @ 8:21 PM
I'll bet you smell very refreshing after playing with all that shaving cream! These turned out gorgeous! I love the blue, especially! Even if the smell does linger, it is super fun to play in the saving cream!
------------------------------ Proud Fan Club Member
Dirty Dozen Alumni
"Art washes away from the soul the dust of everyday life."