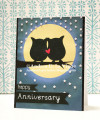
Some friends of ours just celebrated their 29th wedding anniversary! I made them this card for the occasion.
My inspiration came from this card I found on Pinterest. I began with the background, using stenciling techniques I learned in a recent Altenew Academy class, "Stenciled Multiple Ways," taught by Laurel Beard. I first masked off the moon on a panel of yellow cardstock with a piece of masking paper I'd die cut with a circle die. I inked right around the moon with Blueprint Sketch Oxide ink, and further out with Chipped Sapphire, going back and forth to blend the colors. Then, I taped my "Falling Stars" stencil over it, with the moon mask still in place, and spread Distress Grit-Paste over the stencil. After I'd covered all the stars, I lifted off the stencil, and then carefully--and with a bit of difficulty--removed the moon mask. Then I set that aside to dry.
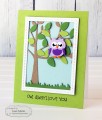
I punched the main owl body twice from black cardstock. For the branch, I used one of the files from "Owl Always Love You." I sized the branch in Photoshop, then selected just the branch & filled it with black. (The branch is a line drawing as-is.) I printed that onto a piece of white cardstock, fussy cut it (I cut off the leaves just to make the job easier), & went around the edges with a black brush tip marker, to conceal the white core of the paper.
For the greeting, I stamped one of the "happy" words from "Birthday Builder" in Versamark onto black cardstock. I also spelled out "Anniversary" with the "Sweet Script" stamps, and stamped that in Versamark as well. I white heat embossed both words, then cut the cardstock into banner strips.
By now my stars had dried, but I noticed they had also turned slightly pink! The Grit-Paste is not supposed to absorb ink colors that it's spread over, but apparently that must not hold true with Distress Oxide inks. A few of the stars had also kind of chipped off, so I just replaced the stencil over the stars & added a second coat of paste. I didn't bother cutting & applying another moon mask this time; I just made sure to avoid that area when I was spreading the paste. I let that dry, and then used liquid glue to adhere my owls & branch. I punched a heart from red cardstock with the Owl punch, and glued that down between the owls. I added my greeting banners with ATG adhesive.
To finish assembly, I cut two 1/4" wide strips of black glitter cardstock, and adhered them to either side of a white A2 card base. I adhered my panel over those, centered so about 1/8" of the glitter peeks out from either side. I did end up having to run a thin line of liquid glue down each side of my main panel, as the ATG adhesive just didn't stick to the glitter cardstock. I made sure to keep the glue to a minimum, though, so it wouldn't mess up the inking on the panel. (I learned that from one of Kristina Werner's videos, where she learned it the hard way!) It did soak through the cardstock & cause a few spots on the panel, but nothing really noticeable--thank heavens!
Date: Monday, June 10, 2019 GMT Views: 1123
Favorited:5