I have an "Internet friend" who I learned has had a rough several months. Even though we've never met in person, I still feel a certain friendship with her. So I decided to make her this card to help cheer her up.
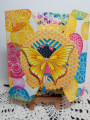
She likes cats, and has one who is black, so I thought this image from "Cool Cats" was perfect for an encouragement card! I stamped it in Fadeout ink onto vellum bristol paper, and colored it with my Prismacolor pencils. I die cut it with the coordinating die, and set it aside.
I recently bought the "Magic Picture Changer" and the add-on die sets as a birthday present for myself. (Thank heavens Lawn Fawn's birthday coupon they'd sent me corresponded with their release that included these dies!) I used the add-on frame to cut from a piece of striped paper from the "So-So-Sweet" mat stack. I first traced the opening for the main die onto grey cardstock. Initially, I heat embossed the first part of the greeting on the grey with white embossing powder, until I remembered you're not supposed to do that with this die set. So I flipped the cardstock over (I hadn't yet die cut it), stamped the greeting, and just traced over the words with a white gel pen. I knew the first greeting would be hidden, so at least I didn't have to cut into a "fresh" sheet of grey! The greeting wasn't quite long enough for the space, so I drew a little mouse at the bottom, using a stamp from an old Paper Studio stamp set as a guide.
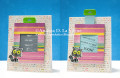
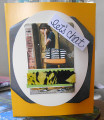
The second part of the greeting was a bit trickier. I traced the window for the pull-tab piece onto blue cardstock--not just the outer edges, but also all the inner diagonal lines. Then I scanned that into my computer, & opened it in Photoshop. I typed the greeting (I made up that part of it) in Photoshop, and slanted the lines of text to follow the traced lines on the scanned image. I printed that out onto the blue cardstock, then lined up my die and die cut the piece. Even I'm impressed that I was able to do that!
I assembled the magic picture changer according to instructions I'd seen on Lawn Fawn's YouTube channel. I did go over the louvers in both pieces with my powder bag, just to help everything move more smoothly. I die cut the pull tab topper piece from green cardstock, and glued that in place.
I cut a piece of music note paper from "Fine and Dandy" to A2 size. I adhered that to a white card base, then popped up my magic picture changer with foam tape. I glued the cat on, making sure she didn't interfere with the mechanism. I love how this card came out--and my friend liked it, too! I can't wait to play with this die set more.
Date: Saturday, April 6, 2019 GMT Views: 353
Favorited:3
Paper: Echo Park "Fine and Dandy" 6x6" patterned paper pad; The Paper Studio "So-So-Sweet" mat stack; Strathmore Vellum Bristol; grey, blue, green, multi-colored
Registered: March 30, 2008 Location: Somewhere between the Shire & Mordor! Posts: 4642
Sat, Apr 06, 2019 @ 6:46 PM
SO CUTE!!!! LOVE this sentiment & kitty too, & your mouse! LOL You did an EXCELLENT JOB & should go in the business of doing Sentiments for us! ;) This looks like a REALLY COOL DIE!!!! Just MAYBE, after seeing this, I'll try one out! A SUPER JOB, on your card!!!! ;)