After completing the first 10 online courses of the Altenew Educator Certification Program and putting a card with description online for each course, I have been told of my Final Challenge for Level 1:
Please make 4 MASCULINE cards. Themes are: Birthday, Love/Thinking of You, Anniversary, and Encouragement.
Select any 3 components from the 10 classes in Level 1
My choice:
Let It Shine: Use of glitter (I think you can add glitter on masculine cards)
Celebration - Stencil Techniques: various techniques with stencils
Easy Ink Blending Techniques: Application of ink with the Applicator Tool (in my opinion harmonizes well with Stencil Techniques)
Once I was told my challenge, I wasn't so happy. I took a long time to complete the online course "For the guys", and then was assigned to make 4 masculine cards. After three hours of moaning I thought, I can do it. I asked myself which materials I have from Altenew that have nothing to do with flowers and how I can use them with a more masculine color scheme for this challenge. Then I had so many ideas that I first wrote everything on a piece of paper so that I wouldn't forget anything.
The cards have turned out a little different. The common features are the three techniques, the square card format (15 x 15 cm) and the color combination (yellow, green, blue and grey).
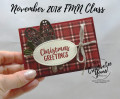
1. Masculine card with the theme "encouragement"
I put the stencil "Wavy Grid" crooked on a white cardstock and attached it with Washi Tape to prevent it from slipping. With the Applicator Tool I spread the ink over the stencil with gentle and circular movements. I started at the top left with light color and light pressure and worked my way down to the darker colors on the right with more pressure. For each of the three colors I used a different sponge to get clear colors.
I stamped the texts with black Versafine. Then I put the stencil exactly in the same place as before fixing it again with Washi Tape. With a spatula I applied the Nuvo Glimmer paste at some places between the words. The colors of the background are visible through this paste, so there is a wonderful glittering play of colors.
Because I liked this so much, I made different attempts: I filled the fields of the "Wavy Grid" completely with paste, or just put the paste into the corners of the sloping squares and I worked with different pastes. The gold paste is also very good. Since it was opaque, I only wiped the gold paste a little into the "holes" of the stencil, which resulted in a beautiful, glittering and yet discreet structure. And there are even more possibilities because of the color design of the background. Give it a try.
Let the paste dry well. Punch out the word "You" from black cardstock with Stick-it (thin double-sided adhesive foil) and stick it on. "CAN DO IT" embossed with white embossing powder on black cardstock and raised by gluing the text with spacers. And finally I glued the whole square with Craft Foam to the card.
Supplies:
Altenew Stamp Set âGoalsâ
Altenew Stamp Set âMega Greeting 2â
Altenew Stamp Set âReason to Smileâ
MFT âAmazing Youâ Die
Altenew Stencil âWavy Gridâ
Nuvo Glimmer Paste âMoonstoneâ
Spatula
Altenew Inks: Fresh Lemon, Bamboo, Dew Drops
Versafine Black
Versamark
White Embossing Powder of Ranger
Applicator Tool
Stamping Platform
Washi Tape
White and black Cardstock
Stick-it
Craft Foam
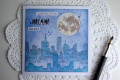
2. Masculine card with the theme "love"
The stamp set "To the Moon" is a Layering Set. I stamped the moon background with the Altenew ink pad "Evening Grey" and then the âmoon crater" with the Altenew ink pad "Moon Dock". The ink pad "Evening Grey" was very liquidy, so I made the first impression on a masking paper, which I cut out for later, and used the second impression on the card.
The template contains two different City Skylines. I started in the middle of the card. I fixed the stencil with Washi Tape and I created the buildings in the background by wiping with a lighter ink color using the Applicator Tool. I started on the stencil and wiped towards the bottom to remove excess paint before coming to the cardstock. The best way to achieve a depth effect is to wipe the buildings farther back with a lighter color. Then I wiped the second skyline with a darker ink. I left the stencil in place and drew the outlines with a thin fineliner and stamped "For you" several times on the buildings. I repeated the same process a third time, also with a border.
Stamp pads used: Altenew "Evening Grey", Distress Inks "Tumbled Glass" and "Faded Jeans".
Another hint, if the stencil is too short for the card format, just reapply it next to it and extend the skyline.
I glued the previously cut out moon mask on the moon and sprayed the whole card with "Glimmer Mist Sapphire". The whole card glitters a little bit, which you can't see so well on the photo. Then I took off the mask and painted the moon with the glittering transparent Wink of Stella pen to give the moon an additional shine.
I punched the word "Moon" out of silver Mirror Cardstock. "I love you to the" and "and back" I stamped on a thin strip of white cardstock with black Versafine and arranged and glued everything together on the card.
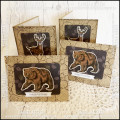
3. Masculine card with the theme "birthday"
The 3D effects with Altenew's Builder Stencils are really amazing (here: âCube Builderâ. From the course "For the Guys" I got the idea of using geometric shapes for masculine cards.
Please note: the stencil will be rotated and flipped, so please clean the stencil after every "Ink Blending".
I always placed the stencil at the lower left corner of the cardstock, so when you turn the stencil, it is always exactly in place. Also here I always fixed the stencil with Washi Tape.
You can color the cubes on 2 sides or all 3 sides. I wiped one side with Altenew Ink "Bamboo" with the Applicator Tool, then, before removing the stencil I added small dots to one cube side by stamping with a dot stamp and Distress Ink "Peeled Paint"; this is a darker green than the wiped green.
After cleaning the stencil I rotated it and went through the same process with Altenew Ink "Tool Cave" (Ink Blending) and Distress Ink "Faded Jeans" (dots).
For the upper side of the cube I put the Altenew Stencil "Sketched Lines" over it. This time the stencil was not fixed, because I pushed it back and forth and wiped light grey lines into the upper cube side with Distress Ink "Weathered Wood" and the Applicator Tool.
The word "Happy" was punched out twice with the Altenew "Happyâ die, first out of matching blue glitter paper and then out of silver Mirror Cardstock. I glued both slightly shifted on top of each other. I stamped the word "Birthday" from the Altenew set "Halftone Happy" with Versafine Black Ink on white cardstock, cut it out and glued it on with spacers.
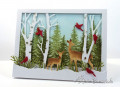
4 Masculine card with the theme "birthday"
With the Stencil "Watercolor Stripes" I dry embossed a white cardstock. It is important that the paper lies between the stencil and the thin rubber mat, otherwise it won't work. Depending on the machine, the "stack" can be different. The embossing is only very discreet, which I like very much.
I left the stencil on the embossed paper and colored the slightly raised stripes with the Altenew Ink "Dew Drops" and the Applicator Tool.
Next, I wiped another white cardstock with the Altenew Ink "Dew Drops" and the Applicator Tool like a kind of blue cloud. Then I spotted the Distress Inks "Mermaid Lagoon" and "Broken China" on a plastic foil, sprayed the colors with water with the Minimister, and dabbed the already light blue paper into the color, so that different color shades and structures were created.
After drying I stamped a bird feather from the Altenew stamp set "Golden Feather" several times with black Versafine on the blue backgrounds and punched them out.
This set also contains dots which I stamped with Versamark on the feathers and embossed them with silver embossing powder from Ranger.
On the raised stripes I stamped several times the words "Happy Anniversary from the Altenew stamp set "Flower Vine" and also on a stripe of white paper. I framed this stripe with blue glitter paper and black cardstock. Then everything was arranged and glued on the card.
This assignment was a real challenge for me but in the end it was a lot of fun.
Kind regards
Gabriele
Date: Saturday, March 30, 2019 GMT Views: 560
Favorited:2