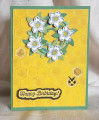
I decided that a bee's "birthday" would be a great theme for this combined challenge. I created a honeycomb main front panel by first using an embossing folder on my 4"x 5 1/4" panel of Stampin' Up! (SU) Hello Honey cardstock. After removing it from the embossing folder, I used the same color ink and rubbed it across the tops of the embellished honeycomb. I intentionally tried to get some ink on the inside of the honeycomb "cells" to darken them so they would look like either cells with bee pupae, or empty cells where the bees had already hatached. Then I cut a piece of yellow vellum a little bit larger size snf embossed the vellum with the same honeycomb folder. I chose "cells" that matched the darker cells on the cardstock, and using an Xacto Knife cut the centers of the cells out. I then covered the entire back of the embossed vellum with wide strips of Scor-Tape, and attached the vellum to the embossed cardstock so that the pattern matched up with the vellum overhanging the sided of the cardstock. I then trimmed the extra sides off the vellum, then removed the backing of the Scor-Tape to expose the sticky adhesive. I laid they vellum exactly over the yellow cardstock, and gently pressed the vellum down to ensure a good adhesion.
The floral wreath was created by die cutting the smaller wreath from the SU "Swirly Squiggles" die set out of both shades of green cardstock. I interlaced these two wreaths to create a thicker looking single wreath. The flowers were stamped on white cardstock using the daisy from the SU "Petite Petals" stamp set using black ink. These were then punched out with the matching SU punch. I "cupped" each petal of the flowers using the rounded end of my scoring tool on top of a flexible mouse pad, then attached the flowers at the center using a Mini Glue Dot. I cut the smallest leaf of the same die set as the wreaths from both shades of green cardstock, then tucked them under the flowers with Tombow glue. The wreath was glued to the top of the honeycomb panel with Tombow.
I wanted a "newborn" bee on the card front, so used a large circle punch to cut the "body" from yellow cardstock. Then punched much smaller black circles for the eyes. The mouth was created by punching a teardrop shape from the black cardstock, then cutting off the larger rounded side of the teardrop. The antennae were created by die cutting the same wreath as for the flowers, but using black cardstock. I then cut the tips off the wreath points. All the bee parts were glued together with Tombow and he was then glued into one of the "holes"
The sentiment was stamped with black ink onto the yellow cardstock. I could have free-hand cut the border around the sentiment, but instead used my ScanNCut2 digital cutter with a .04" outline for the yellow piece, then cut again from black cardstock with a .12" border. I glued the sentiment and its black mat together with Tombow, then attached it to the card front with adhesive foam strips.
As is typical, it took longer to design the card than to actually make it. I am rating the difficulty level at "3" out of a possible "5" because of all the steps required. Of course, I challenged myself because I had never overlaid embossed vellum on embossed cardstock, nor used my digital cutter to cut borders around stamped sentiments. So I learned some tricks along the way... which is ALWAYS good!
Date: Tuesday, February 12, 2019 GMT Views: 510
Favorited:2