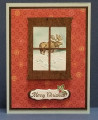
I started by creating the window element by die cutting the Small Madison Window from Stampin' Up!'s (SU) Wood Textures DSP paper stack. I then cut a piece of SU Whisper White slightly smaller than the window frame, and stamped the moose from SU's 1994 retired "Wildlife" stamp set (it's so old it's not even listed on Splitcoaststampers pull down list!). I used SU Early Espresso ink to stamp the moose, and a retired Creamy Caramel Stampin' Write Marker to color him.
I sponged an SU Soft Sky around the moose to create a light wintery sky, then tore pieces of SU Whisper White cardstock to create snow banks for the moose to stand in. To accentuate the snow banks, I lightly sponged the torn edges with Soft Sky, then liberally brushed them with Wink of Stella to create a sparkly winter scene. The three pieces of "snow banks" were glued to the white moose panel so that his legs were "buried" in the snow.
After gluing the moose panel to the back of the window frame, I put several adhesive foam strips on the back and set it aside.
The next element I made was the sentiment panel. I stamped the "Merry Christmas" greeting from the SU "Merry Patterns" set using SU Early Espresso ink. I then die cut the sentiment out using the label die from Momenta Art-C. To mat the greeting, I die cut a second label from SU Early Espresso cardstock, then cut the brown label in half, and glued the two pieces to the back of the white label. To give a subtle Christmas flare, I stamped a holly cluster (from SU Carols of Christmas) using SU Garden Green ink, but before stamping it onto a scrap of Whisper White cardstock, I used a pencil eraser to remove the green ink from the berries, then used a Rose Red Stampin' Write Marker to color the berries red. This holly cluster was then die cut using the matching die from SU Card Front Builder Thinlits Dies. It was glued onto the upper right corner of the sentiment label.
Finally, came the assembly of the card. I cut a piece of circle "wallpaper" background from Recollections Festivus Paper Pad to 3.75"x 5", then matted it with SU Early Espresso cardstock that was cut to 4"x 5.25". These matted panel was then glued to the A2 sized SU Soft Sky card base.
The window scene was attached to the front panel using adhesive foam strips to give it the 3D look of a window on a wall. The sentiment element was also attached beneath the window using foam strips.
I'm rating this card as a difficulty level of "3" out of a possible "5" due to the effort required to create the window scene. If you are an experienced card crafter, the level would be more like a "2".
I think this is a perfect "guy" Christmas card, and am pleased to submit it to WWC192 as a Design Team (DT) entry.
The inspiration to create this masculine card was from Retro Rubber Blog Challenge's Tic-Tac-Toe. This time of year it seems all I am doing is making Christmas cards, so it was great to have the RRBC challenge to give me the idea for a window card with a moose standing outside.
Date: Wednesday, October 17, 2018 GMT Views: 737
Favorited:2
Stamps: SU Wildlife, Merry Patterns, Carols of Christmas
Paper: SU Soft Sky, Early Espresso, Whisper White, Wood Textures DSP, Recollections Festivus Paper Pad
Paper Size: A2
Ink: SU Early Espresso, Garden Green Soft Sky, SU Stampin' Write Markers Rose Red & Creamy Caramel
Accessories: PoppyStamps Small Madison Window Die, Momenta Art-C Christmas Stamp/Dies, SU Card Front Builder Dies, Wink of Stella, Tombow Multi Liquid Glue, Adhesive Foam Strips, Craft Sponge