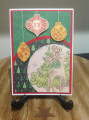
I was going through my (ahem--vast) stamp collection, and came across this "Gift Boxes" stamp. Frankly, I had forgotten I had it (blush)! So, since I need birthday cards, I decided to use it for that.
I stamped the boxes onto a scrap of bristol paper with Versafine Onyx Black ink. I colored them with my Tombow markers, using a water brush to blend out the colors a bit and provide some highlighting. After that had dried, I colored in the dots with a blue sparkle gel pen, & the stripes on the smaller box with a gold gel pen. I then die cut it with a circle die. I used the next size up die to cut a mat from teal cardstock, and glued them together.
I cut 2 pieces of patterned paper to 4" wide, and used the "A2 Curved Edge" die to cut the bottom edge of the upper piece. I held my focal image circle up to the bottom right corner of the pink piece, & penciled lines along the edges on the back. I used scissors to cut along those lines, and glued my focal panel to the pink.
I decided to mat my layers with a light yellow cardstock. Before I adhered them, I stamped my greeting in Versafine in the middle of the mat, and die cut it with a scalloped circle die. (I knew the die cut hole would be covered up, and this way my greeting matched the mat perfectly.) I adhered my pink patterned paper to the mat, and added the upper patterned piece overlapping the pink.
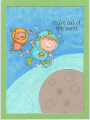
I die cut 2 balloons from bristol, and colored each with a Tombow marker. I again used a water brush to blend out the color. It blended out a bit too much, to where I lost the shading. So when it was dry, I went back in with my marker, added shading to the lower left, and blended that out a bit with my water brush. Finally, I added a layer of shimmer to each balloon with my Spectrum Noir sparkle pen.
I used crochet twine for the balloon strings. I started tying my knot, and before I'd pulled the twine all the way tight, I looped it around the bottom of the balloon. I pulled the twine tight to finish tying it, and then tied it once more for a double knot. I coated the string with liquid glue, and wrapped it around a paintbrush handle. I let that dry, so the string would be curly.
After my strings had dried, I glued my balloons & greeting to the card front. I trimmed the strings, and used a drop of Ranger Multi Medium Matte to tack each down a bit, so they weren't quite so unruly. Finally, I used my ATG tape runner to adhere the card front to a white card base.
Date: Friday, June 1, 2018 GMT Views: 451
Favorited:2
Registered: July 9, 2008 Location: Stars Fell on Alabama Posts: 74942
Sat, Jun 02, 2018 @ 11:46 AM
Ooh, so pretty and I love your stamp for a birthday. The curved die design is great and I really like those curly balloon strings.
------------------------------ My Blog---My Gallery---My PinterestI'm a Punchkateer! (Prez) FOREVERDirty Dozen Alumni2014 CAS Spring DT--- Inspiration Challenge Co- Hostess 12/02/17-12/28/19 Watercolor Wednesday Design Team Hebrews 13:2Brenda