I was inspired by TGIFC Design Team members Elizabeth, Carolynn, and Christy with elements of their cards when I created my card for this week's challenge. Thanks, ladies!!!
The card base is a standard A2 (8-1/2"x 5-1/2") Stampin' Up Island Indigo cardstock folded in half. The main panel where I did all my brayering is a piece of SU Whisper White cardstock is 5"x 3-3/4" matted with another piece of Whisper White cut to 5-1/4"x 4".
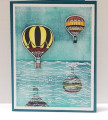
I started by using the Splitcoaststampers "Brayered Sky" technique to create both the sky and the water using SU Bermuda Bay, then SU Island Indigo ink. I then used a large Post-It note to cover the sky area, then sponged the horizon using SU Island Indigo so it blended down into the water.
After removing the Post-It note, using Memento Tuxedo Black ink, I stamped the two balloons from SU's "Life Me Up" set in the sky portion of the panel. Having done that, I then stamped the balloons upside down in the water slightly offset from their matching sky balloon. Note that since I didn't want a super dark image, I "stamped off" my the balloon stamps onto a scrap piece of paper before stamping the reflection images.
The next step was to stamp the balloons again, but this time on a piece of SU Whisper White cardstock. These were the images I colored using Copic Markers. I used a color wheel to help me select the tetrad pairing of colors for the balloons. As I colored each "sky" balloon I had stamped on the scrap piece of Whisper White cardstock, I also colored its "reflection" image in the water portion of the main panel. That made for easier coloring as I went along.
After coloring the reflection balloons in the water, I used my "go-to" 1991 waves stamp from a company called Purple Wave. Using clear Versamark, I stamped the waves offset repeatedly across all the water areas. I then used white embossing powder and my heat tool to emboss the "white caps".
As a final step, I used the SU "Up & Away" thinlits dies to cut out the two balloons I had colored on the scrap Whisper White cardstock. Because the dies don't fit EXACTLY to the stamped images, they left a white "rim" around the balloons. I remedied this by sponging SU Island Indigo around the diecut balloons so they would blend into the sky. I then mounted each of the balloons over the top of their black sky versions using adhesive foam strips to make them look even more like they were floating in the sky.
I decided not to put a sentiment on the card so that I could use it for whatever occasion I might need it for in the future. The stamp set comes with several nice large sentiments that I can stamp inside the card once I decide to whom I would sent it.
I am rating the difficulty level for this card as a "3" out of "5" just because of all the steps required. None of the individual steps are particularly difficult, but take in the whole, require some time and card.
Thank you again Elizabeth, Carolynn, and Christy for the inspiration!
Date: Sunday, May 27, 2018 GMT Views: 1095
Favorited:7
Registered: June 27, 2012 Location: Washington Posts: 25246
Mon, May 28, 2018 @ 12:13 AM
This is LOVELY! Great brayered sky and water with super-looking, white embossed waves. Your hot air balloons are colored with such soft and serene colors and their water reflection is such a super job! LOVE IT!
------------------------------ Carlene aka Chatterbox-1--My BLOG; My Pinterest;My SCS Gallery; FAVORITES Team Member; 2022 Christmas Card Challenge 75/105. My SCS Goal: Challenge Catch-up; Sketch Challenge Sample Card Team (August 2022--January 2023).