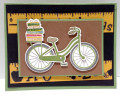
I had a brass "School Days" embossing template that I thought would be perfect for this sketch's optional theme (school days). So, I started by cutting an 11" strip of Stampin' Up! Hello Honey cardstock, and laying the brass template over it. I stuck a piece of removable double-stick tape on the back of the yellow strip and layed it down on an easy wipe craft mat. I then smoothed a layer of Dreamweaver's Translucent Embossing Paste over it to fill in all the "holes" in the template. The technique I followed is called "Pasty Razzle Dazzle" which has a tutorial at Pasty Razzle Dazzle Tutorials at Splitcoaststampers I carefully removed the brass stencil and washed it in warm soapy water. Let the embossing paste competely dry (mine too half an hour since I used a thin coat). After it dried, I layed the stencil back down EXACTLY onto the dried paste, and using Memento Tuxedo Black ink and a sponge, I covered all the paste showing through the stencil holes until they were solid black. Again, remove the stencil and clean it with your favorite stamp cleaner. Allow the in to dry on the paste while you continue with the card.
The next step was to stamp and die cut the various pieces of your bike onto Whisper White cardstock. I thought this would go quickly, but with all the pieces, it took me a good half an hour to do the bike. It took me a bit longer to use markers to ink, stamp and die cut the stack of books that was to go on the back of the bike. I used my MISTI for almost all the bike stamping because most pieces needed stamped twice.
The bike was assembled on a piece of Kraft cardstock that was just a little larger than the bike itself. I used Adhesive Foam Strips to raise entire bike up off the cardstock surface to give it depth. Mini Glue Dots were used to tack down the bike frame to the wheels. The stack of books were also raised up using foam strips.
I then assembled the card by first gluing down the yellow ruler pieces onto a 4"x5-1/4" Basic Black piece of cardstock, then using Adhesive Foam Strips, attached the matted bike piece on top of the rullers.
While I like the effect the embossing paste creates on the ruler, it was messy and time consuming. So, that, plus the time and attention the bike took, I am rating this card at a difficulty level of "4".
If I were to do it again, I would have stamped the wheels on Kraft cardstock instead of Whisper White, so that the space between the wheel spokes would have looked like the background.
Date: Tuesday, August 8, 2017 GMT Views: 796
Favorited:2
Accessories: SU Build a Bike Framelits Dies, Stencil Scrapbook Collection School Days Brass Template, Dreamweaver Embossing Paste, Tombow Multi Liquid Glue, Adhesive Foam Strips, MISTI, Mini Glue Dots, Sponge


 this is a really cute card!


