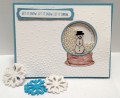
Made for Christmas Card Throwdown Technique Challenge #08: http://52cct.blogspot.co.uk/ that required the creation of a shaker card.
The snowglobe was stamped using a 2002 stamp set I bought at Michaels called "Holiday Snowglobe". I started by stamping the snowglobe onto a 5-1/4"x4" SU Whisper White Heavy Cardstock panel, then using a 2" circle die aligned with the globe, I ran it through my Big Shot almost all the way so that the bottom of the circle would not be cut. I then fussy cut by hand the flat bottom of the globe (which ended up to be an unnecessary step since I later put a blue diecut around the edges of the globe).
I then hand colored the globe base using an Aqua Painter and Chocolate Chip ink. Then panel was then inserted into the SU Softly Falling embossing folder and ran through the Big Shot to add random "flakes" to the otherwise plain panel.
I then laid this embossed panel on top of a 5"x3-3/4" Whisper White panel and with a light pencil marked the edges of the globe opening onto the smaller layer. This gave me an indication where to stamp the snowglobe on the smaller panel using Marina Mist ink so the globe boundaries and "glass" shadowing would show through the opening when the card was assembled.
I had bought some pretty porcelain buttons shaped like Christmas items MANY years ago. Using Tear & Tape sturdy tape, I affixed the snowman so it sat on the "bottom" of the blue snowglobe. Then, put a double layer of Adhesive Foam Strip around the globe so the pearls would have a place to roll around. I did a double layer because the porcelain button was pretty thick. Before putting the mini pearls in, I used my Embossing Buddy anti-static dust bag to dust the inside edges of the double-high foam strips so that the pearls would no stick to them along the inside edge of the square I had built for them to roll around in. It's not necessary to make the foam strips fit the circular edges of the globe as long as you make the square large enough so it can't be seen when looking through the globe cutout on the front of the card.
I then laid the acetate square over the double-high foam strips after filling the square with mini pearls. I then put adhesive foam strips around the perimeter of the panel of that panel (and a few inside the open area so the front card panel wouldn't "sag" once assembled. The final step was to lay the larger front panel onto the sticky foam strips on the smaller panel to create the shaker card sandwich.
This assembly was then glued to the Marina Mist card base using Tombow glue. When I saw the assembled card, I felt the snowglobe needed more definition, so I used the 2" and 2-1/8" Layered Circle dies to cut a thin Marina Mist circle that I glued onto the edges of the globe.
The final step was to stamp the "Let it Snow" greeting from the SU "Happy Scenes" set onto a scrap of Whisper White using Marina Mist ink. Since this greeting was longer than my two punches, I had to use a special technique to create longer labels and matting. For the Word Window punch, I cut the stamped greeting into a strip 3/16" wide so it would fit into the punch being fed from the front of the punch (as seen when you turn the punch over to watch how it is punching) with only one end actually going into the punching mechanism. I did the same with the other end so the word window with my greeting was now 2-13/16" long.
The matting for the greeting had to be punched differently since the Modern Label punch is wider on the ends than it is in the middle. I simply cut two labels from the Marina Mist cardstock, then trimmed one end of each of the labels down to narrow sides that ended about halfway along the label,,, then glued them overlapping so that they together created a matting that was 3-1/8" long. This matted greeting was attached to the card front using Adhesive Foam Strips.
I gave the card a "4" rating for difficulty because of all the extra care you have to use in creating the snowglobe shaker.
HINT: I would recommend NOT using such thick buttons inside a snowglobe because of the necessity to use thicker foam between the two layers. The card front would sit more even if you had a thinner snowman.
Date: Sunday, April 16, 2017 GMT Views: 1125
Favorited:4
This is a very pretty card, I love the idea of using pearls in the shaker, and the snow globe is the perfect image, it just works so well! The embossed card front, and touches of blue, set it off beautifully. Thank you for joining in with the Christmas Card Throwdown. Lucinda