Heartfelt Creations Products Used and Products Carried in Their Shop:
HCPC-3753 Classic Rose Vines Cling Stamps
HCD1-7111 Classic Rose Vines Dies
HCPC-3752 Classic Rose Cling Stamps
HCD1-7110 Classic Rose Die
HCDP1-270 Classic Rose Paper Collection
HCD1-745 Luggage and Tags Dies
HCST1-401 Deluxe Flower shaping Kit
Designer Dries Clear Glue
New Sprout Memento Ink
Stampendous Aged Ivory Embossing Enamel
Lettuce Entertain You Prills
Other Supplies: Spellbinders Floral Ovals, Spellbinders Classic Ovals Large, White Seam Binding, White Cardstock, Dimensional Tape, Canson Watercolor Paper, Hot Glue Gun
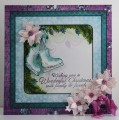
My card size is 4 1/4 X 5 1/2. Make card base and cover with a piece of the paper collection. Cut the largest Floral Oval Die out of white cardstock and then cut a piece of the paper collection with the largest Classic Oval Die. Glue the paper onto the Floral Oval and set aside. Cut a length of white seam binding and spray with water; then scrunch to crinkle and set aside to dry. Next stamp, emboss and cut out the rose petals and the leaves using the watercolor paper. Apply New Sprout ink to the leaves and then shape with an embossing tool from the flower shaping kit. Spray the back of the rose petals with a mist of water and begin to shape using the flower shaping kit. Once they look the way you want them to, set them aside to dry. When the petals are dry add the Prills to the center. While you are shaping the petals, have fun and play with them. Remember in nature all flowers are different. Next I shaped the rosebuds and laid them aside to dry. When everything is dry, use dimensional tape to adhere the Floral Oval to the front of the card. Glue down the flowers and leaves and cut out a cute little tag from the paper collection. I used dimensional tape behind it as well to give a bit more dimension to the front of the card. Next I tied a bow and used my hot glue gun to adhere it to the card front.
Date: Wednesday, September 14, 2016 GMT Views: 209
Favorited:3