Registered: January 9, 2005 Location: Colorado Springs, CO Posts: 828
Tue, Apr 25, 2006 @ 11:33 AM
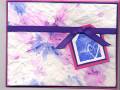
This is an awesome idea. You are very creative. This would make a great teacher appreciation card with a slot for each child to include a message. Would you mind sharing instructions. TFS
Registered: December 1, 2004 Location: On a ship in the Caribbean! Posts: 1833
Tue, Apr 25, 2006 @ 11:55 AM
I was PM'ing the instructions..but I think that I will post them here instead...
Notes:
1. � please make note that some filters are not exactly symmetrical so you must keep track of which way your filter is facing and keep it the same way when stamping and assembling
2. � when stamping, inks may bleed through to other side, you may want to put a scratch piece of paper inside the filter when stamping.
Instructions:
To Create front and back covers:
First you need to create two patterns, one for the mat board, and one for the cover that will go over the mat board. Take one of the filters to use as a pattern. You trace around the filter making a pattern about a � in larger (all the way around) than the filter, this will be the mat board pattern. Repeat tracing around filter at � in � � in larger, this will be the cover over the mat board. Cut out both patterns.
Using mat board pattern, cut 2 from mat board � one for front and one for back.
Using cover pattern, cut 2 from patterned paper.
Take one of the mat boards and put a thin layer of modge podge on one side, lay down onto the back side of the pattern paper cover, hold flat while it adheres and dries a bit. Set aside, repeat with other cover.
Using bone folder, run it along all four edges of the mat board, putting a small crease in the pattern paper. This will make the folding over easier. Repeat on other cover.
On the four corners, you need to clip off the corners. Then you need to cut some small slits in the pattern paper just up to the mat board, around the curved side of the filter, I would recommend like 10 slits or so spread out across the whole top, so that when we adhere it will not bunch up or bubble. This is very similar to the technique using in sewing around arm holes and such.
Apply modge podge to the 4 flaps and fold over adhering to mat board.
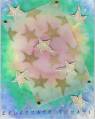
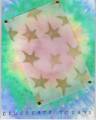
Using a filter as a pattern once again, cut another piece of pattern paper and adhere using modge podge to the inside/backside of both covers, to give the covers a finished appearance.
Embellish covers as desired.
To create �filter� pages:
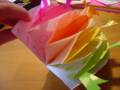
Take filters, and rubberstamp various designs in various colors all over front and back of filters.
Take filter and place in front of you in the V shape, opening at top, adhere filters together by running a strip of red line tape in the very center from the top to the bottom leaving about a � inch space not adhered at bottom.
Now adhere pages inside the front and back covers using modge podge. Let dry.
To create page inserts:
You need to create another pattern. Take a coffee filter and trace around it on scratch paper. Now take your filter and measure in how far the seam is on the filter on both sides and base of filter. Take that measurement and apply it to your pattern. Cut the pattern out.
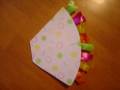
Take a piece of pattern paper twice the size of your filter pattern, fold it in half, so that filter completely fits on the folded paper. Using your new pattern, place it on the fold of that pattern paper and trim out. Now you will have a folding insert to put inside your pages. Repeat for as many pages you have in your book.
Staple various ribbon from the top of the page inserts for a fun look.
Alternatives and other fun ideas:
You can bind using a hole punch and ribbon or metal rings at the base rather than gluing pages together
You can bind by hand stitching coffee filters together as an alternative as well
Instead of modge podge for creating cover � you could laminate the front and back covers
Instead of covering mat board cover with paper, just paint it with acrylic paints
------------------------------ *�*My Lua girl ....7yrs and 242 lbs 2006-2013
Registered: September 24, 2004 Location: Space Place Posts: 1096
Tue, Apr 25, 2006 @ 3:58 PM
I want to be in your group... these are so cute!!!! I saw them in a mag and wanted to try them out.
------------------------------ We could learn a lot from crayons: some are sharp, some are pretty, some are dull, some have weird names, all are different colors, but they all have to learn to live in the same box. Robert Fulghum