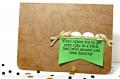
This is for Linda's fun Tortoise or Hare challenge.
I work like a tortoise on tranquilizers, but that suits me just fine. I make cards because I love the process. If I don't like a card I put it in a box and use it at a later date for die cutting or a mixed media card base, stencil over it etc. When I have a string of failures, like I have this week....I have pleated punched strips littering my desk from Sabrina's challenge, I coloured in some flowers for the CAS challenge...they looked dead, the colour challenge card has been turned into punched butterflies and I didn't even try the sketch challenge.
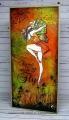
My tip this week, if you have lost your mojo and nothing is looking right, choose one of your own cards that you love and recreate it in a different colour. I originally did this card in purple last December (MIX100). I wouldn't normally repeat a card for a challenge but it seemed appropriate as Linda has encouraged us to share tips.
The background is my favourite smack & squirt technique - smack distress ink onto a sheet of aluminium foil, squirt with water then using a foam blending tool swipe the inky water over your cardstock. After you have applied the colours (in this case green and orange) choose what areas you want to be more intense then randomly scrub undiluted distress ink onto cardstock using the blending tools.
I usually ink all around the edges with walnut stain distress ink. This seems to make the other colours look more 'blended".
The dancer is stamped with Archival ink, coloured with Distress Inks and an aquapen then when completely dry, fussy cut her. To get all the variance in the colours smacks the ink pad on foil and carefully squirt a tiny bit of water in one corner only. From this one smack of an ink pad you will have about 10 different shades of the one colour. I think I used Spiced Marmalade (if not it is ripe permisson, both are sitting in front of me as I type this LOL).
TIP: Stamp image onto a piece of acetate - no need to fussy cut unless you are using the acetate as a mask. Move the acetate image around the cardstock and work out where it will look best. I keep the acetate stamped image with the stamp.
Add foliage; use tree and foliage stamps upside down or sideways. Finish with a doodled border. The trick is to use a very fine pen, put the card squarely in front of you, hold the pen and place the side of your hand on the desk. With the pen nib touching the card drag your hand down the length of the card ensuring the side of your hand stays in constant contact with the desk. When you get to the bottom, rotate the card and do the same thing again. Do not look at the line as you are dragging your hand on the desk, look at the edge of the card. About two thirds of the way down do a loop de loop or a few zigzags or go back later and add them in. Little imperfect circles and zigzags take your eye away from the line. The line doesn't have to be straight; otherwise you would use a ruler!!
Fussy cut tip: After fussy cutting use a dauber with a small amount of black ink on it and carefully ink on the cut edge, trying not to get too much ink on the image, just the cut edge.
Date: Thursday, March 26, 2015 GMT Views: 1527
Favorited:12
Splitcoast Dirty Dozen Alumni Creative Crew SU Design Team Alumni
Registered: October 29, 2004 Location: Coos Bay, Oregon Posts: 24007
Thu, Mar 26, 2015 @ 9:17 PM
OMG Susie, I just had so much fun reading your detailed description of all your tips. TFS your tips and Gorgeous background and main image Beauty my friend! Hugs, nancy
Registered: March 24, 2012 Location: West Virginia Posts: 1241
Thu, Mar 26, 2015 @ 9:44 PM
Wow, this is gorgeous. Love this color combo, and I loved reading all your great tips. Believe me, if I can remember them they will be useful and helpful. tfs.
Splitcoast Dirty Dozen Alumni Proud Fan Club Member
Registered: June 19, 2010 Location: SC Posts: 6005
Thu, Mar 26, 2015 @ 9:46 PM
Susie, when you started creating mixed media cards your inner Donna Downey came out to play and we at SCS are the happy recipients of the results. Please don't stop taking your tranquilizers (she laughs) you're my favorite tortoise! The color you achieved with your smack and squirt technique (I love your adjectives) is beautiful (and I'm very partial to this color combo). And who doesn't love fairies?! Surely not I (she winks). Always a top notch card and a write-up that keeps us coming back for more!
Splitcoast Dirty Dozen Alumni Favorites Team Notifier Splitcoast Challenge Hostess
Registered: October 26, 2009 Location: Oakhurst, near Yosemite Nat'l Park. Posts: 46806
Thu, Mar 26, 2015 @ 9:52 PM
Great tips Susie!! I love your dancing fairy!! I think we should have a get together and stamp up a bunch of fairies (and other stuff!!) That would be so much fun!
Love your green and orange bg and all the bits of foliage all around!! Always looks so magical! (As it should for fairies, huh?) Oh, I did the white school glue thing! I love the result. Maybe I'll use it tomorrow for MIX if it works out.
Thanks for all the info! Your card is beautiful to say the least!
I just saw Susie's comment...love the Sugar Babies on top!
------------------------------ Blessings, Robin Encourage one anotherMy Blog-InkMagination , QFTD201,Dirty Dozen Alumni.Impression Obsession DT, ECraftDesigns DT, Formerly HC DT, ODBD DT, DRS DT
Registered: March 31, 2008 Location: Eastlake, OH Posts: 22598
Thu, Mar 26, 2015 @ 10:00 PM
When you do these backgrounds with fairies, they are my favorites! I'll never tire of seeing your beautifully blended background colors and the wonderful aura you create using ink and stamps! The way you use your foliage stamps is fabulous, Susie! Right into favorites!
Another winner, Susie. I love it. Like you, I am a tortoise. I will sometimes work on a card for 2 days because it doesn't suit me. A card making friend and I cannot make cards together. We took a class together when I was starting out. The instructor had all the pieces cut out for 3 cards and all we had to do was glue them on the card base. My friend had all 3 done in about 30 minutes and after 2 hours I hadn't finished but 1 and started on another one. She is just happy slapping them together as the instructions say to but I of course, loving the creative process, had to change them up and put them together in a different way. I felt badly because one of the ladies in the class asked the instructor, "how come you don't teach us to do cards like Sue". I went in her craft store later and apologized. I taught a kids card class last summer at our local Art center and there was a little girl in the class that tore apart all the embellishments I gave her and used them in her own unique way. I thought it was wonderful. She was showing her own creativity.
Registered: March 7, 2009 Location: Where the corn is knee high by the 4th of July Posts: 17498
Fri, Mar 27, 2015 @ 1:46 AM
FABULOUS card, Susie! LOVE the inky bkgrd and your dancer with those awesomely colored "butterfly" wings! WOW! Thanks for the doodle tip. I always have trouble with that so I rarely do it. Not only does inking the edges of die or hand cuts define them, it can "blend" imperfect edges. (Guess how I learned that? Hee!) xx
Registered: February 5, 2007 Location: St. Louis, MO Posts: 92600
Fri, Mar 27, 2015 @ 3:52 AM
FANTASTIC is your signature, Susie....and your cards always have a wonderful "aura". Love the sharp contrast of the fairy's white body parts against the colorful bg....a POW factor. It's easy to see why your creations aren't whipped out in an hour.