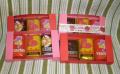
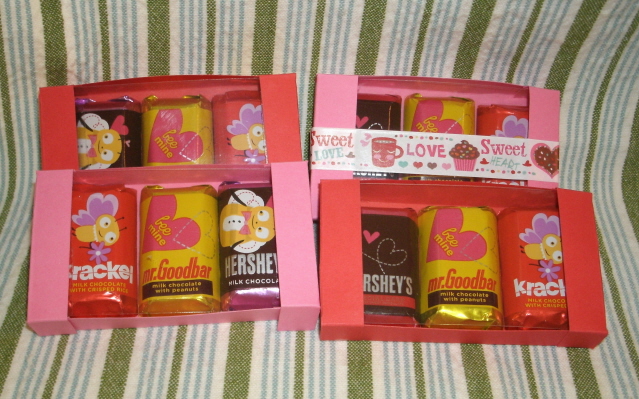
I saw a mini candy box project where the candies were wrapped with DSP and placed in a box bottom, then bagged and tagged. I liked the idea and have kept it for future use.
While working on the final Valentine's Day fry box and clear bag treats today, I realized I had this candy bag unopened. Never one to turn down a chocolate opportunity, I toyed with creating a 3-piece candy box with a clear view insert, not a full lid. I didn't want to cover the pretty wrappings, unlike the original box I saw.
The instructions are given for each box.
(1) Trim colored cardstock to 3" x 5 1/2", then score it at 1/2" on each long side, and at 1/2" and 1" on the short sides. This will give you the basis for some "tabs" in the corners. You should see two 1/4" squares at each corner. (2) Crease all score lines firmly. (3) Cut on the 1" and 1 1/2" score lines at the long ends; cut from the outside only to your long side score line which will separate this inside long edge square from the rest of the paper. Do not cut it out! This will give you 1/2" "tabs" on all 4 sides. One of these tabs will go inside the box and the other will go over that to create an end cover edge. (4) Apply double-sided adhesive or glue dot to secure all tabs. You will need to do this 4 times for the inside and 4 times for the outside flap. Check my picture for the end-result visual. (5) Place either a glue dot or spot of double-sided adhesive on the back of each candy wrapper. Place the middle one in the box first, then one to each side of it. There will be a small bit of room at each end but is unseen. (6) Trim your clear cardstock/acetate to 2" x 3 1/4" size. (7) Carefully apply one or two glue dots to the underside of each end cover of your cardstock base box, about 1/3 of the way in on each side, as best you can. Then slide your trimmed clear cardstock/acetate into the opening, being careful to "catch it" with the glue dots. I pressed ever so slightly. This will secure the clear piece to cover the box bottom. I did this in step 7 because my adhesive was catching when I tried to assemble the box and/or place the candies inside in just the right place. Sticky fingers were not appreciated, so wait until step 7 to place the adhesive on the underside of the end flap. I also tried to put it on the acetate/clear cardstock, with limited success. ( Decorate and package as desired to share with those who matter in your life!
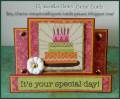
I've never shot a tutorial video, so I hope that these written steps work for you. I think the boxes are cute! The washi tape you see over the middle of one box is from Dollar Tree. I haven't quite decided on the finishing touches, but wanted to post this for those of you still prepping for Saturday! Once you do one box, you'll get the hang of it (I hope!). It took me three times to get this sizing correct, and more than a few adhesive fingertips, so a candy treat was well earned!
Happy Valentine's Day to each of you crafters!
Diane
Date: Tuesday, February 10, 2015 GMT Views: 1105
Favorited:3
Registered: October 12, 2007 Location: Arizona Posts: 70209
Sat, Feb 28, 2015 @ 2:47 PM
Hey Diane ~ How cute these little boxes are! Thanks for sharing the details on how you made them. Your box holds the candy and displays it at the same time. That's clever! Nicely done. TFS ~ Diane
Registered: July 19, 2012 Location: central PA Posts: 444
Sun, Mar 01, 2015 @ 5:31 AM
Diane - I appreciate your comments! They were a hit for those who are too tempted by larger quantities of chocolate (myself included!). I hope you could get one done. March has come in like a lion here in central PA - snow, snow, snow! Another crafting afternoon awaits me. Diane


 Decorate and package as desired to share with those who matter in your life!