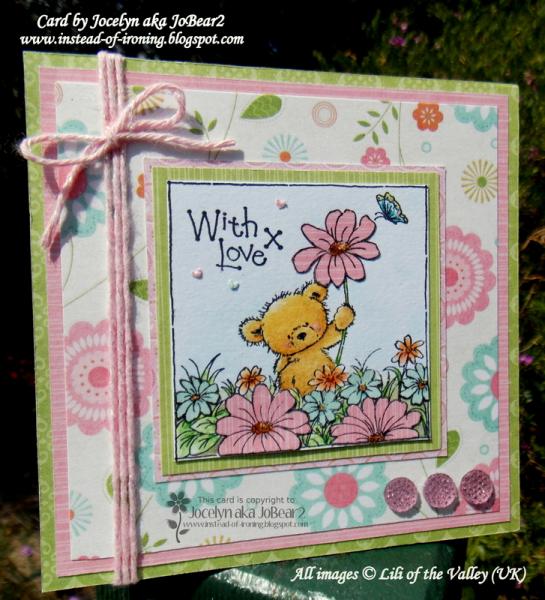
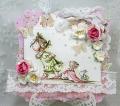
This is a birthday card I made for my American SIL's birthday.
The image is from Lili of the Valley (UK) and was stamped onto watercolour cardstock using Ranger Archival Jet Black ink and coloured with Lyra + Faber-Castell watercolour pencils. I lightly chalked around the image using Kaisercraft blue chalk for the sky.
My process for cardmaking is to choose the image then the papers so I can match up the colouring with my designer papers. I couldn't get the pink shade quite right on my flowers nor the tealy-aqua - and I was getting very frustrated and the flowers ended up looking very ho-hum because you can't fiddle with watercolour paper too much or it starts to pill. I almost threw the image out when I had a sudden flash of inspiration - paper-piecing! Yep, that technique that I keep forgetting about!
So I re-stamped the image onto another sheet of matching pink paper and tealy-aqua paper and cut out the flowers. They were VERY fiddly to cut out but I just took my time and used some of those super-magnifying glasses & my paper-tole scissors - and once I had cut them out, I went around the edges with a black pen to hide any imperfections with my cutting. Yay - image saved and I was no longer grumpy: see, this is me ---> :-D
I attached the flowers to my image using Tombow Mono Aqua glue which gave me a little bit of time to move the flowers into their exact position before pressing down firmly. I added a bit of orange and yellow to the flower centres using Tombow pens plus a little bit of grey under the flower centres to give some depth to the flowers.
The sentiment is also by Lili of the Valley from their set - General Greetings Small.
I used an EK Success Arrows Border punch to punch tiny little hearts (ie: they are the leftover punchies which look like tiny hearts) from the pink + tealy-aqua paper and glued them around the sentiment. I added Stampin' Up Dazzling Details glitter glue to these hearts, the teddy's cheeks, all the flower centres and all over the butterfly.
The main image panel was attached to 2 sheets of designer paper and were trimmed to 1/8" and 1/16" respectively using my Perfect Layers Tools.
The pink and green on the card base is also designer paper and these were trimmed to 1/8". I tied on some Blossom Iridescent twine and added Fray Stop to the cut ends to stop them from fraying. I love this twine because it has a sparkly thread through it and it's so pretty.
I glued on 3 pink Sparklets using Glossy Accents. I kept the card very simple as I usually do plus I didn't want to cover up the pretty floral base paper. Lastly, I added my card front to a white cardstock base using Stampin' Up Fuse Fast adhesive which is super-strong.
I am popping this card into the SCS Technique Lover's Challenge of TLC485 of Paper-Piecing Revisited from a while ago. You can read more details about it here----> TLC485 ~ Paper Piecing Revisited ~ (6/9/14) by joan ervin at Splitcoaststampers I encourage you to try some paper-piecing as it is a really fun technique.
Stamps: LOTV You are my Sunshine ST378 + General Greetings - Small ST063
Paper: First Edition Spring Drop 6" x 6" pad, Ranger Distress Watercolor cs
Paper Size: SQ
Ink: Ranger Archival Jet Black
Accessories: PLTS, Kaisercraft blue chalk, SU Fuse Fast, Tombow Mono Aqua glue, black pen, The Twinery Blossom Iridescent twine, Fray Stop, Lyra/FaberCastell watercolor pencils, Tombow pens, EK Arrows border punch, pink sparklets, SU Dazzling Details, white cs
Splitcoast Dirty Dozen Alumni Proud Fan Club Member Splitcoast Challenge Hostess Teapot Tuesday TEAm
Registered: April 18, 2011 Location: Melbourne, Aus Posts: 51844
Fri, Jan 02, 2015 @ 7:31 PM
Jocelyn this is super cute. What a brilliant idea to paper piece the flowers!! You sure don't let the heat effect your creativity LOL. Everything about this gem makes me smile. Stay cool.
------------------------------ Susie
Please don't take your organs to heaven - heaven knows we need them here.
Registered: June 10, 2011 Location: Canberra, Australia Posts: 7345
Fri, Jan 02, 2015 @ 8:32 PM
Beautiful Lili of the Valley image and I agree about your not wanting to cover up the lovely design paper. The image is so nicely coloured and the little sentiment is just perfect for this card.
Registered: February 21, 2007 Location: Bay City, MICHIGAN Posts: 17556
Fri, Jan 23, 2015 @ 8:11 PM
Adorable image and I love how your flowers turned out- Your SIL is going to be thrilled to have this card- the coloring is beautiful and matches your papers very well!!
------------------------------ SUE aka GREENIE - Twisted Sistah Handmade cards because..No one displays an email on their mantle, or saves a FB post in a box of treasures! Nothing is impossible with God!
Registered: April 6, 2006 Location: Las Vegas, baby! Posts: 14934
Wed, Apr 29, 2015 @ 6:30 AM
Adorable! Just added this to my faves, thank you! I love that all of the layers are dp, the paper-pieced flowers are gorgeous, the color combo is yummy, and the embellishments are perfect! Oh - and I just bookmarked your blog, so thanks for that, too...
------------------------------ ~ Sue Happy for no reason...