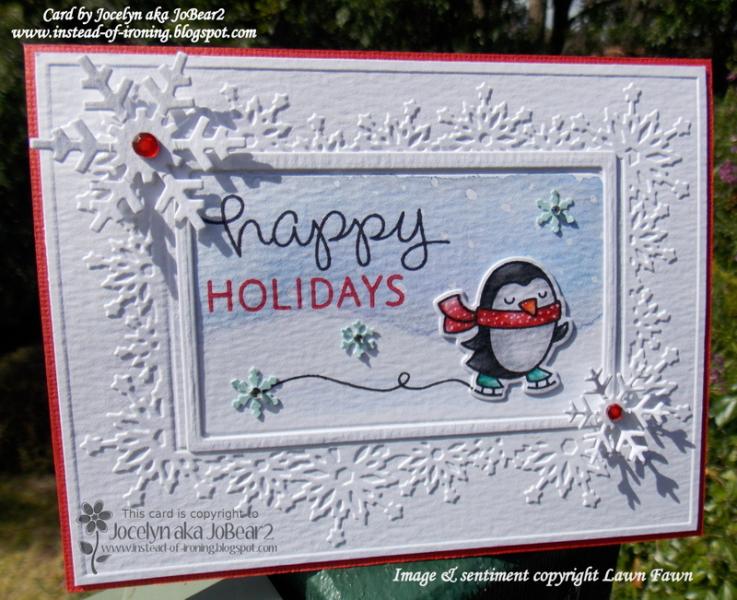
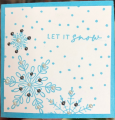
I am finally getting on with some Christmas cards - yay! I dry-embossed a piece of Ranger Distress watercolour cardstock using my Big Shot and Ultimate Crafts Snowflake Frame embossing folder (from their 2014 Feliz Navidad Collection). I really love how this folder has a blank section in the middle for your image.
To do the background, I drew a wavy line with my pencil as a guide for where I wanted my skyline then used an old paintbrush to drop in dots of Masking Fluid where I wanted the snow to be. Once this was dry, I wet the cardstock with clear water using a flat paintbrush and dropped in some watered-down Winsor and Newton watercolour paints in blues, purple and a little bit of grey and just let them mingle together. I left it to dry and then used my finger to rub off the Masking Fluid which left white dots for snow. I also painted the area to the left of the penguin with watered-down W&N Ultramarine watercolour paint. The sky looks quite a bit paler in the photo than in real life and you can see the detail a bit better in the close-up photo on my blog - there is a link at the end of this write-up.
I was a bit clumsy when I painted the sky and some colour leaked into the dry-embossed frame (next time I will mask off that section!) and it didn't look very good so I tried to sponge the colour out but just made it worse! I was getting very cheesed off and almost tossed the jolly thing out - but then came up with the idea of adding a diecut frame over the embossed frame to hide the mess and was lucky to find one that was almost the right size (Lifestyle Nesting Card Templates die set) and figured it was near-enough so ran with it. I glued it on using Tombow Mono Multi glue. Phew! And you know, I actually preferred having a frame over the centre compared to no frame.
I stamped the penguin onto Distress watercolour cardstock using Ranger Jet Black archival ink and coloured him with Festive Berries and Peacock Feathers Distress Markers and Black Soot Distress ink using a #2 round paintbrush. I added some white dots on the scarf using a white gel pen then diecut the penguin using the matching Lawn Fawn die.
The sentiment is also from the Winter Penguin stamp set and was stamped with Ranger Jet Black ink and Ancient Page Cardinal dye ink.
I drew in the black skating line using a Zig .03 black pen then glued on the 3 x pale teal cardstock snowflakes around the image. The snowflakes are the leftover punchies from using a Martha Stewart Snow Flurry edge punch: I love these punchies because the snowflakes are so tiny and perfect for adding as little embellishments. I added silver Papermania PMA351103 rhinestones to the centres.
The white snowflakes are by My Favorite Things - and I used the smallest and 2nd smallest dies from their Snowflakes Trio Die-namics set. I popped them up on dimensionals and added Kaisercraft SB711 red rhinestones.
I layered the main panel onto red cardstock and trimmed the edges to 1/16" using my Perfect Layers Tools.
Lastly, I used a Clear Wink of Stella glitter pen to add some sparkle to the scarf, skates and the pale teal snowflakes and some Glossy Accents to the penguin's beak (not that you can see it in the photo....sigh.....)
Registered: October 30, 2007 Location: Posts: 26718
Sat, Dec 20, 2014 @ 6:55 AM
Such a pretty card - love that white on white for your background. I would love to know what frame/snowflake embossing folder you used, if you have time to answer. Love it!