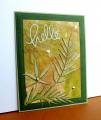
My first attempt was a disaster when I became over zealous with the crinkling phase and tore small holes in the paper - didn't notice until I was adding the color. Start over ... a little more gently. After it partially dried I cut it with SB/card creator rectangle, which also helped flatten it a little. Next, while still damp, I did the wrinkle free distress technique. I spritzed it with walnut stain and quickly wiped it off. That worked great; it only stuck to the wrinkle cracks - yay! Next, I created a frame, again using SB/cc (hind sight is 20/20 wish I'd made it a lighter color). Cut out the PB/Fresh Breeze and stained over it with SN/alcohol inks. Added SS/Hello, sequins and Liquid Pearls.
Date: Friday, September 19, 2014 GMT Views: 1117
Favorited:5
Registered: March 31, 2008 Location: Eastlake, OH Posts: 22598
Fri, Sep 19, 2014 @ 6:12 PM
That background is gorgeous and no way would I have changed a thing! Thank you for sharing your techniques and you obviously have a winning combination! I love the added "pearls" which appear to be dew drops on the wonderful fern! I also love the way you use the Spellbinders to create such a beautiful frame!
Registered: September 21, 2006 Location: In the beautiful Sequatchie Valley, Home of the Paper Clip Project - The National Cornbread Festival Posts: 26563