Make Templates before using good paper
You need to make 2 of these templates: 1 for the card base and 1 to cut apart for the contrast color
Cut printer paper 7 1/8” wide x 7” Tall. On the 7 1/8” side measure: 3”, 3 ½” and 4”. Score only on the 3” and the 4” marks. DO NOT FOLD. Draw a light line at the 3 ½” mark. This is the center of the card and where you will adhere the string for the spinning balls.
To cut the center circle (from both templates) place Spellbinders Classic Circles Small – Die #7 on the card so that the die is 1 5/8” from the left edge and 1 11/16” from the bottom edge. Cut out. The 2nd circle needs to be in the exact same place as on the card base. Lay the 1st template over the 2nd. Lay the Die inside the cut circle, tape in place and cut. Label the sections on the 2nd Template: Left Top, Right Top, Center Top, and Center Bottom. Cut out along the score lines. Trace your contrast templates onto your contrast paper and cut out by hand. Trim off about 1/8” from the outside edges of the Left and Right pieces only. For the 2 center pieces trim only the tops 1/8”.
I sized the digi Soccer Balls so they were 2 5/8” in diameter. You need 4 balls. Cut 1 ball out of each of the Classic Circles Small - Dies #5, #4, #3 an #2. Type or stamp your verse and cut it out using Die #5. Set aside
Adhere balls together using 1 Dimensional in the center of each ball. Be sure the lines on the balls match up. Do not add the verse to the balls at this time. Set aside
Assembling the card
Cut your White Cardstock 7 1/8” wide x 7” Tall. Lay the “Card Base Template” over your card base and tape in place through the center circle. Tape Die #7 in place over the cut out circle and cut. Lightly label the top of the card. Add your score and center lines. Trace your contrast templates onto your contrast paper and cut out by hand. Adhere the left/right sides in place. Don’t worry about the center it will be covered.
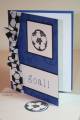
Spinner section. Place Red Line tape on the centerline from the edge of the circle to 1/8” from the outside edge of the card. Remove cover. Cut a piece of thread 10” long. Lay the thread over the tape and along the center line, pulling it tight, leaving about 1” extending beyond the top and bottom of the card. Press thread into the tape. Add another piece of red line tape over the thread. Remove the cover and loop the end of the string over tape. Press in place next to the original string so it won’t slip out. The loop keeps the thread from slipping out. Find the center on the back of the verse circle. Adhere a piece of Red Line Tape down the center. Adhere the verse circle to the string and press the string into the tape. Add another piece of Red Line Tape over the string and press it into the string to secure it. Add 1 more piece of Red Line tape on either side of the center thread. Be sure the tape is at the edges or the pieces won’t stick. Adhere the back of the balls to back to the Verse. Line up the edges carefully and center the lines of the ball along the string. Be sure it clears the die cut areas so it will spin. Add the Center Top/Bottom pieces over the string. Cut a white circle frame using Classic Circles Large Dies #7 & small #6. Glue around the center circle.
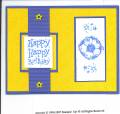
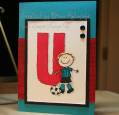
Greeting: Type your greeting using the Apple Chancery Font in a size 12. Cut out using Classic Circles -Small - #3. Cut/Emboss Classic Circles - Large - #3 using Orange paper. Adhere the greeting circle to the Orange circle by matching the score lines on the larger circle. Add Orange Stickles to the edge of the orange circle. Adhere to card using Dimensionals.
Finish the card by adding soccer stickers.
Date: Friday, August 29, 2014 GMT Views: 4184
Favorited:3