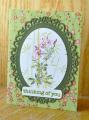
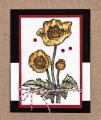
This is the third of 3 cards made in 2011 using the direct coloring technique using Marvy markers to color directly onto the rubber stamp--using this technique for the first time. For two of the cards, I used Local King Rubber Stamps cling rubber stamps, and for the masculine card, I used a SU rubber stamp.
I was first introduced to this technique when I discovered the wonderful Canadian stamp company Local King Rubber Stamps Company (based in Vancouver, BC--stamps available online on their website as well as at their booth at numerous crafting shows all over North America) at a stamping/scrapbooking show near Toronto, Ontario Canada called ScrapFest. You will find co-owners Lisa and Nader at their booth at many of the main crafting shows throughout Canada and the US, and when you do, I'd highly recommend that you save some time to stay and watch Lisa at work. She is able to create amazing masterpieces, and she can show you that it is a very easy process to recreate. Their stamps are of the highest quality (I LOVE them, definitely my favorite Canadian stamp company), and they have matching dies for many of their sets made by Spellbinders. You will be glad you invested in these stamps, especially if you want some bold stamps so you can try this direct stamping technique. They also have line-art stamps that can be colored with copics and a variety of techniques too, but I tend to buy their bold stamps and their wonderful glossy cardstock.
As it was explained to me, this cardstock is not like the other glossy cardstock on the market, that it has a clay component to it, and it has been imported (perhaps from the orient, I do not remember), and they sell it in packages of 40 pieces, about the size of an ATC card, I am not sure of the exact size. The price was very reasonable for the cs, and at the shows, they have great deals, like buying 3 sets and getting the 4th for free, etc. I do not know what they offer now, this was a few years ago. I was also very blessed to take a card-making course with Lisa at a local stamping store near my home. She and husband, Nader work well as a team. She has some YouTube tutorials too online. I do not have any connection with this company, I just like their products!
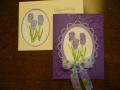
Please see the view with the card front and envelope flap for a description of this card. This view of the card front and the envelope front shows the difference between stamping on the glossy cardstock, which really brings the colors to life, and stamping the same image using the same markers on regular white cardstock.
Thank you SO MUCH for stopping in to check out my card! When you leave a comment, it really makes my day!!! It is my goal to learn from your comments and to grow and improve as a card-maker. Please feel free to browse in my gallery, I hope that you have a great day!
Blessings,
Joanne
Date: Monday, August 18, 2014 GMT Views: 2248
Favorited:5
Registered: June 4, 2009 Location: Deatsville, Alabama Posts: 83888
Sun, Aug 24, 2014 @ 1:02 PM
Very pretty! That technique is wonderful and your ribbon and images are beautiful. Wow! Hugz
------------------------------ Nancy Williams - Hope your day is Spirit-filled and ink-filled (in that order)!DRS Designs-DT, Punchkateerforever, Dirty Dozen Alumni
Registered: February 13, 2005 Location: Southern Ontario Posts: 26257
Mon, Aug 25, 2014 @ 1:40 PM
Well... how did I miss this beauty? This is absolutely gorgeous and the colours you chose are perfect. The sparkle and dazzle really adds to the fabulous look of your beautiful creation. I love Local King Rubber stamps and her matching dies too.


 It is my goal to learn from your comments and to grow and improve as a card-maker. Please feel free to browse in my gallery, I hope that you have a great day!