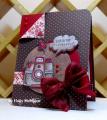
First, I took a piece of white cardstock. Using a sponge, I smeared (yes, smeared) Tim Holtz tea bag distressing ink in an area large enough for what I needed. Get a good coverage.
Then I took a porous sponge (actually that dense styrofoam type packing material works too) and I dabbed that in versamark. I tapped the sponge on my distressed area randomly and then covered it in clear embossing powder. When you tap off the excess embossing powder, look at your piece to see if there are gaps. If you have too much coverage, take a small paint brush and tap it randomly on the piece to remove some. Heat set the embossing powder.
Next, I took Tim Holtz antique photo distressing ink and dabbed it generously onto the piece, then rubbed it in a bit with my sponge so that some comes off the embossed area. I then repeated that step with both close to cocoa and chocolate chip ink.
Once you've created your faux cork, you can die cut it to what shape you want, or just use it as a background.
TFL!~
Date: Thursday, May 1, 2014 GMT Views: 1292
Favorited:3
Registered: June 29, 2004 Location: Sugar Land. Texas Posts: 79522
Thu, May 01, 2014 @ 4:57 AM
What an adorable card and thanks for the information about how to do faux cork. Too bad I didn't see if before I did my card.
------------------------------ LizThe joy of the LORD is my strength.Right Brain Madness --My blogProud member of the redDivasKSS certified multi-step stamperFan Club member since 2004
Registered: February 5, 2007 Location: St. Louis, MO Posts: 92451
Thu, May 01, 2014 @ 6:38 AM
Terrific card, Holly. TFS how to create faux cork when one doesn't have any....or can't find it. ; ) Love your "capture the moment" theme with the camera.


 A couple of years ago I came up with a technique to create faux cork. You can see my original card (from 2012) here: