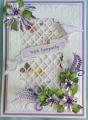
How to make the hinge card: For the card base cut 8 ½” x 11” White Cardstock in ½. On 1 piece of the white cardstock cut and emboss using Spellbinders 5” x 7” Matting Basics A - #7. On the 2nd piece, score the 5 ¼” side at ½” and crease. Lay cardstock on the die so the fold is inside of the cut line. Cut and emboss. Adhere together so that the hinge is on the bottom so your can cover it.
Layer 1: Cut 2 pieces of Lavender Cardstock using Matting Basics B- #7. Adhere I piece to the card front. Save the other piece for the inside of the card.
Layer 2: Cut /Emboss 2 pieces of White Cardstock using Matting Basics A- #6. Adhere I piece to the card front. Save the other piece for the inside of the card.
Layer 3: Cut /Emboss 2 pieces of DSP using Matting Basics B- #6: 1 for the front and 1 for the inside of the card. Adhere 1 piece to the White cardstock. Adhere this section to the card using Dimensional Tape.
Layer 4: Use the Cuttlebug “Brocade Window” Embossing Plus Folder for the last layer. Remove from die and cut smaller using Matting Basics B- #6.
Emboss/Cut Spellbinders Fancy Lattice. Adhere to the back of the “Brocade Window” using ATG Tape. Add Dimensional Tape around the edge of the “Brocade Window”. Do not adhere to card yet.
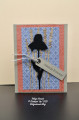
Spellbinders Ribbon Banners: Add Sentiment. Cut and emboss using Ribbon Banners – Die #3. Before removing from the die use your blending tool to add color around the edge of the die. This leaves a white border. Stack Dimensional tape 2 high and add to the back of the Banner. The birds are from Heartfelt Creations Garden Romance Dies and stacked 2 high.
Emboss/Cut Spellbinders Fancy Lattice. Adhere to the back of the “Brocade Window” using ATG Tape. Add Dimensional Tape around the edge of the “Brocade Window”. Do not adhere to card yet.
Spellbinders Ribbon Banners: Add Sentiment. Cut and emboss using Ribbon Banners – Die #3. Before removing from the die use your blending tool to add color around the edge of the die. This leaves a white border. Stack Dimensional tape 2 high and add to the back of the Banner. The birds are from Heartfelt Creations Garden Romance Dies and stacked 2 high.
Lay the Lattice section on the card. Do not adhere to card. Lay the Banner as shown. Carefully remove the tag and make a pencil mark on the DSP where you want the Tag to go. Add a strip of Dimensional tape to the DSP to hold the lattice up where you put the tag on. Adhere Lattice Layer over the DSP. Add 2 pieces of Dimensional tape on the bottom of the Tag and adhere to card shown.
Flower Sprays: Martha Stewart Hydrangea Punches - Punch 4 medium and 4 of the largest 3-in-1 punch. Score each petal in half and draw a vein down the fold and 2 on each side. Form flower and glue together. The center flower centers are from Punch Bunch Medium Big Sky Punch. I added glitter and to the dots. For the smaller flowers I cut the stamen shorter. Marianne Creatables Seed and Head Leaves were added to the top spray. I used Marianne Creatables Decorative Elegance for the bottom spray.
Date: Saturday, November 9, 2013 GMT Views: 3571
Favorited:16
Accessories: Spellbinders: 5” x 7” Matting Basics A and B, Fancy Lattice, Ribbon Banners – die #3; Cuttlebug “Brocade Window” Embossing Plus Folder; Marianne Creatables Decorative Elegance and Seed and Head Leaves; Heartfelt Heartfelt Creations Garden Romance Dies;