Heartfelt Creations Products Used:
HCDP1 235 Burst of Splendor Paper Collection
HCPC 3377 Sympathy Sentiment PreCut Set
HCPC 3405 Leaf Medley PreCut Set
HCPC 3406 Botanical Floral 1 PreCut Set
HCPC 3407 Botanical Floral 2 PreCut Set
HCD 729 Decorative Blossom Corner Die
Art Glitter Dries Clear Adhesive
459222 Paper Blossoms Tool Kit
Viva 3D Stamp Paint (Rose Metallic, Moss Green Metallic, Walnut Brown Metallic)
Other Supplies: Ranger Distress Ink, glue, Scor-Tape, Spellbinders dies (Foliage, Flourish Trim, Rose Creations), Canson watercolor paper, glitter, Memento Ink
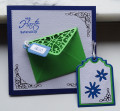
Instructions: Card Size 6” X 6”
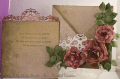
When I sit down to create I seldom have a clear picture of my finished project in mind. I wanted to have a different fold for this card so I decided to do a tag card. I went online and found the dimensions for my card and started there. Then it began to take on a life of it’s own. I covered the base card with the pretty papers and then used the Art Glitter glue to add glitter to the design like Emma Lou showed us in her video. Such an easy technique with a big pop of Wow! While this was drying I stamped and cut out my flowers and leaves and also the two flourishes I would use to hold the card closed. I glued down the flourishes and left that to dry while I started working on my flowers. Now flower making, for me is not a science. I decide on the paper I want to use and I let it tell me what it wants to look like. Doesn’t that sound so creative….actually it isn’t! Different papers lend themselves to different looks. On these I used watercolor paper for the petals and I colored them with the Viva 3D stamp paint. The paint made the paper a little stiff and so they were a little difficult to work with. Lots of water on the backside and curling on the front side. Then when they were dry I glued them together and set them aside to dry again. I added some Viva 3D paint to the leaves and then shaped them to make them look more like the real thing. Now I decide on the placement and glue the roses and the leaves down into place. While that is drying I started on my tag. It measures 5 1/2 “ X 5 1/2". I started with watercolor paper and then I cut out the corner die and colored it with the Viva 3D paint to match my roses. I taped the die cut to the top of my tag and then covered the whole thing with some of the pretty paper, allowing part of the decorative die to show. Next I stamped my sentiment and the tag and card are ready to go. Since I had the pretty flowers and leaves on the outside of the card, I left the tag relatively simple.
Date: Friday, August 9, 2013 GMT Views: 467
Favorited:3