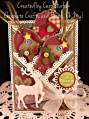
My card design for today looks complicated but really is an easy way to create an Easter scene. The Spellbinders Classic Editions set has a fun cart die that I have found very useful in creating many of my cards. I die cut it with black card stock and then coated it with the Sakura 3D Crystal lacquer and set aside to dry. I did the same thing for the bunnies and dragonfly.
Die cut out all your Memory Box pieces and glue your flower pieces together. Next die cut the Oval and emboss with the Polka Dot folder then cut in half using the decorative scissors.
Punch out the grass strips, Cherish Border and eggs from the basket punch. Glue the yellow Cherish strip slightly above the orange piece to create a shadow effect and attach to top of card.
To assembly the card glue one grass strip at bottom of card, then second strip slightly above and add bunnies, chick and eggs. Before gluing cart to card take oval egg and add the Madera corner piece and attach flowers, now glue to card along with the white bunny. To complete add dragonfly.
Registered: May 18, 2008 Location: Virginia Posts: 24623
Wed, Jan 30, 2013 @ 3:37 PM
OMG Diane, this is filled with diecuts to the max. You Easter scenery came out so cute. Love the layered grass which gives a 3-D effect. This is awesome!
------------------------------ Pam Co-Founder of The Punchkateerz! Fan Club Member FS149, QFTD44
Registered: October 21, 2007 Location: Alberta, Canada Posts: 6707
Sun, Feb 03, 2013 @ 2:28 PM
What an adorable easter scene you have created here! Love those cute little bunnies and the egg holding all those beautiful flowers!
------------------------------ Lynn
SCS Fan Club Member "Everyday is a gift, that's why they call it the present." author unknown http://jellybeandancer.blogspot.com/