My daughter found the idea for this project on Pinterest and it looked much different and also glued the poms down. She wanted something that could be used again next year so this is what I came up with.
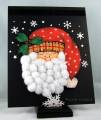
ItÂ’s a countdown to SantaÂ’s yearly visit; the child will add one pom each day to finish off Santa's beard and when the 24th pom is added that means Santa's coming that night.
This is a free clipart image which I found on multiple sites in both color and black and white. I didnÂ’t want to use all the marker ink it would take to color it so I printed out three of the color images and cut out minus the beard and popped each one up with foam tape starting at the base to create dimension to go with the height of the beard. You can find the site links for the image below in a direct blog post link.
The Cheery Lynn holly leaves were cut, ink distressed (Ranger - Pine Needles) and glued to the image with AleeneÂ’s tacky glue. Then I added the red self-stick gems and a little Signo white gel pen to accent them.
I cropped the nose from the image and printed out an extra to dry emboss and popoed it up on the project with foam tape.
The plaid on the hat was accented with Stickles and 3D paint to add a little dimension and touch of the paint also went on the eyes.
One piece of the picky side of sticky back Velcro (1" wide) was attached across the entire width of the base top to hold all 24 poms.
12 -½” pieces of both sides of sticky backVelcro are cut then cut those pieces in half again to get 24. While both pieces are stuck together remove the paper from the soft side and stick the Velcro to the pom; I trimmed about 3/8 of the pom off to form a flatter side to better hold the sticky Velcro.
Now remove the paper from the sticky side of the Velcro and stick all three pieces to the beard section starting at the top corner near the hat and continue until all 24 poms are added to the beard in a nice shape. I then added extra sticky pieces in between so the child has a better chance of hitting Velcro when adding a pom to SantaÂ’s beard. Mom or Dad can always move it later if needed to keep black from showing in the beard
TIP: I suggest Mom or Dad remove the pom from the storage strip and hand it to the child and make sure youÂ’ve got a good hold on the Velcro not just the pom so you donÂ’t pull it off the Velcro!
I embellished the background with Cuttlebug Snowflakes #2 die cut snowflakes and stars and the stand snowflake is from Spellbinder Shapeabilities which is stuck on layers of cardboard that are covered with black cardstock and it fits down in a grove meant to hold the plate edge.
I used what I had on hand for supplies (chipboard, Velcro and stand) and was able to put to use this plate stand that has been sitting in my stained glass supplies for years, I donÂ’t even remember where it came from.
This finished project measure 9 x 11” but you could easily create it on an 8 x 10”chipboard stand from a photo frame which could be purchased from a dollar or thrift store.
More photos and site links for the image can be found on this direct blog post link.
Date: Monday, November 12, 2012 GMT Views: 1276
Favorited:4
Splitcoast Dirty Dozen Creative Crew SU Design Team Alumni
Registered: January 7, 2007 Location: Southern California Posts: 42824
Tue, Nov 13, 2012 @ 8:33 PM
My goodness, this is just so cute, Roxie. I just want to reach out and touch that soft beard. What great fun it will be to build Santa's beard to count off the days til Christmas. Your colorful Santa really pops against the dark blue sky.
------------------------------ Kathy Stamp n Sip with me