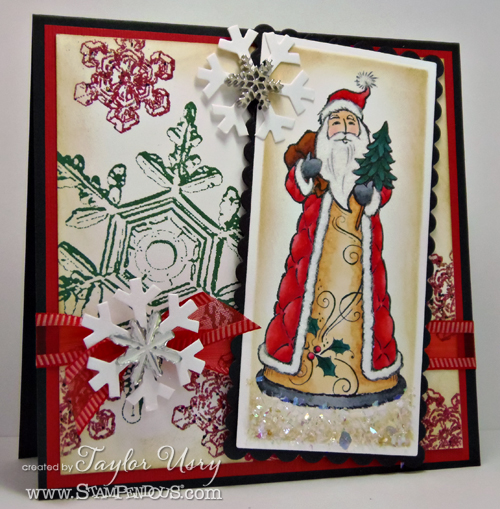
I'm sharing a fun card today with a newly-released stamp called Forest Santa, from Stampendous. I love Santa stamps and figures, so I was particularly excited to color this one up! Here is a breakdown of the markers I used on this card:
I attempted to make this be reminiscent of the carved wooden figurines I have, so when I colored the middle part I used went over the darkest parts of the TN3 with extra TN1, in a circular motion. Interested in a bit more detail on how I put the whole card together?
~Cut square card stock base, square read panel, large square white panel.
~Randomly stamp snowflakes on white card stock in both green ink and Versamark. Pour Aged Scarlet enamel on, heat set from underneath. Apply distress ink to edges as desired. Attach to red panel; adhere both to card base. Tie ribbon around in an off-centered knot.
~Die cut long rectangles; stamp Forest Santa image and color as desired. Add distress ink to edges with a sponge. Using glue pen, cover beard, fur edges of coat and hat; apply fun flock. Also using glue pen, cover bottom of die cut panel and apply shaved ice.
~Adhere Forest Santa panel using foam tape on a tilt. Attach snowflake die cuts and buttons as desired.
Supplies:
Stamps: Forest Santa, Jumbo Snow (Stampendous)
Card Stock: Black, Red (Bazzill); White (Mohawk)
Ink: Forest Green (Stazon); Tuxedo Black (Memento by Tsukineko); Versamark (Tsukineko); Brushed Corduroy, Antique Linen (Ranger)
Coloring Medium: Spectrum Noir
Accessories: Cottonball White Fun Flock, Shaved Ice, Aged Scarlet Enamel (Stampendous); Misc Snowflake buttons (Unknown); Die Cut White Snowflakes (Creative Cuts & More); Ribbon (May Arts)
Tools: Classic and Scalloped Long Rectangle Nestabilities (Spellbinders)
Date: Tuesday, July 24, 2012 GMT Views: 1026
Favorited:4