Come join our Challenge this week~ make your own background with your main image stamp!
Check out the details here
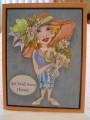
this image is a front and back from Art Impressions. I used both images and stamped around the edges of the card, each panel is edged in black using a cork backed ruler and a marker. this is a great way to get a finished edge without adding the weight of another piece of paper.
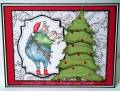
the tree is cut apart in sections, sponge the edges with olive ink then using a fine artist pen doodle around each piece, assemble each layer with mounting tape, and decorate as you like.
my coloring is gamsol/prisma pencils.
thanks for taking a look~ have the best day!
Date: Wednesday, November 9, 2011 GMT Views: 805
Favorited:5
Registered: February 28, 2011 Location: Alberta Posts: 4345
Wed, Nov 09, 2011 @ 10:48 PM
Hi Judy!
Your background looks fantastic! Love the tree, it is decorated perfectly!! I have this image and can't wait to show it some ink! Superb card GF!!
Hugs!
Registered: April 20, 2005 Location: The only Eaton Rapids on the Earth, Michigan Posts: 57568
Thu, Nov 10, 2011 @ 12:49 PM
This cute Christmas card is just oozing with creativity, Judy-kins. Your coloring is always magnificent, of course, and I especially love how you cut the tree in sections for dimension. The doodling on those sections is a great way to create extra visual interest. I don't know why, but the Fanny image stamped in black and white in the bg made me think of Scrooge and the ghosts of Christmas past and present. Maybe it's that stocking cap she's wearing. LOL!
Registered: February 24, 2009 Location: WA Posts: 18298
Fri, Nov 18, 2011 @ 12:46 PM
this brings back memories of my dad trying to get that Christmas tree light strings all sorted out! Thanks for explaining your technique, I love your tree
------------------------------ "You can't use up creativity. The more you use the more you have." -- Maya Angelou