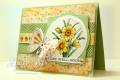
Started by picking out from my stash of plain white cricut cutouts (from Paper Lace) the flower and the butterfly. Using a circle nestabilities, I cut off the center of the flower, and then embossed it with the rubber embossing mat. Placed on my ranger's non-stick craft sheet, and using Tim Holtz victorian velvet ink pad, I tapped on the white flower. Then I filled in the blank spots with Color Box cat's eye pads in Rouge, Chiffon White and Cranberry.
Cut out a slightly larger circle out of a scrap of patterned paper, and glued it to center of flower. Next I colored the butterfly by rubbing on it with a blending tool by inkssentials that had drops of Tim Holtz antique linen color. I glued the butterfly to a piece of card stock which I had colored with the Color Box chestnut roan pad, and then cut around it. Inked edges with Dark Brown Color Box ink pad. Glued butterfly to flower, and went to work on the background. I used a cutout from my cricut that looks very similar to the label 1 nestabilities, placing it in the middle of a white piece of card stock and using it as a mask. I rubbed around the edges of the mask with Color Box chestnut roan color, then took off mask and rubbed a bit inside the blank space with the pad, then using the Dark Brown color, I colored the outside of the masked area. Filled in with antique linen color and the blending tool. Went to cut out the panel and messed it up slightly, so it's not exactly a rectangle. Didn't stress- just went with it. Found some white leafy branches, which were cutouts from the Create a Critter cricut cartridge. Colored those with the blending tool and the antique linen reinker. Glued the branches on the background panel, then glued on the flower with the butterfly. Glued a 3" x 4 1/4" piece of kraft card stock to the back of the panel, then glued all that to a standard size 4 1/4" x 5 1/2" piece of dark green Stampin Up! card stock. Inked the edges of the green part with the Dark Brown Color Box pad. Stamped the "congratulations" from Stamping Up!'s congrats set on the same green card stock and set it aside. Picked out some more plain white elements cut out with the Paper Lace cricut cartridge. The loopy corner accent on the top right corner is colored with antique linen by Tim Holtz, and the fleur de lis parts which look like ornamental iron bars are colored with the Color Box chestnut roan. Glued those on to the card, and then glued the sentiment in place, and glued that card front on to a standard size kraft card base.
Note: I'll probably go over this with Dazzling Diamonds glimmer mist because the Aleene's Tacky Glue I used made a complete mess of adhesive. Problem is, the paper was so saturated with ink that if I used the Tombow tape runner, the paper started coming apart and I was afraid it was going to tear. Should've used the xyron machine, or if I had any, I would've used spray adhesive, since sometimes, when using the xyron, the very very thin bits on the cricut cutouts just break apart.
Date: Thursday, June 23, 2011 GMT Views: 742
Favorited:2
Additional Info
Stamps: Stampin Up! Congrats set
Paper: Georgia Pacific white card stock; kraft card stock; Stampin Up! dark green card stock
Ink: Color Box cat's eye pads in Rouge, Chiffon White,Cranberry, Dark Brown and Chestnut Roan; Tim Holtz destress inks in victorian velvet and antique linen
Accessories: Create a Critter cricut cartridge;inkssentials blending tool;ranger's non-stick craft sheet;circle nestabilities; rubber embossing mat; big shot; Aleene's Tacky Glue; Paper Lace cricut cartridge